One-Rep Max Basics and Calculation Methods
A one-rep max calculator helps you estimate the heaviest weight you can lift for a single, clean rep in a specific movement. That number matters because it gives you a simple way to plan training loads, track progress, and keep your workouts honest without guessing. If you lift in pounds and follow a program that uses percentages, your estimated 1-Repetition Maximum (1RM) becomes the anchor for load prescription.
This guide is the hub for the whole topic. You’ll get the big ideas behind 1RM testing and submaximal testing, the most common 1RM formula options (like the Epley Formula and Brzycki Equation), and how strength and conditioning (S&C) coaches use training percentages, RM ranges, and progressive overload to build strength safely. We’ll also cover the basics of safety and support, including spotter use, power rack setup, and the role of good lifting technique.
Start here: Use the one-rep max calculator in 60 seconds
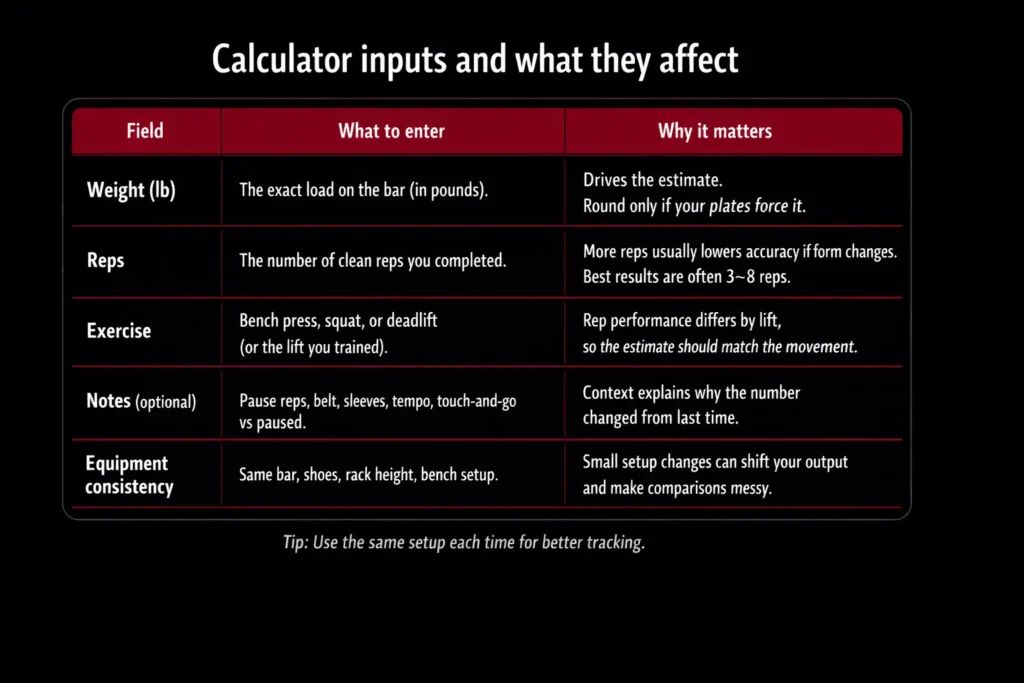
What you enter (weight in pounds, reps, exercise)
Pick the lift you’re trying to measure, then enter the weight in pounds and the number of reps you actually completed with solid form. Think of this as Submaximal Testing for most people. You’re using a challenging set to estimate strength without needing a true max attempt. For best results, use a set that feels hard but controlled, usually somewhere in the 3–8 rep range.
What you get back (estimated 1RM + training percentages)
The calculator gives you an estimated 1-Repetition Maximum (1RM) based on your inputs, plus a table of training percentages you can use right away. This makes load prescription simple. Instead of guessing what “heavy” means today, you can choose a target like 70%, 80%, or 90% of your estimate and build your working sets around it. You can also use the result to translate between rep goals, like moving from a 5RM to a projected 1RM, then back into a new plan.
Quick reality check (clean reps, consistent depth, same equipment)
Your estimate is only as good as the rep you put in. Keep reps clean, hit consistent depth on squats, use the same bench setup, and don’t mix equipment changes (different bars, shoes, or rack height) and expect identical numbers. Treat your estimate as a repeatable reference point, not a trophy.
1RM basics: what it is and why lifters care
1RM as a strength “snapshot” (not your identity)
Your 1-Repetition Maximum (1RM) is the heaviest weight you can lift for one rep with control, full range, and rules you’d be willing to repeat next week. It’s a read on absolute strength, but it’s also a moving target. A rough night of sleep, a rushed warm-up, sore hips, a different bench setup, even a shaky walkout can change what “max” looks like that day. That doesn’t mean you got weaker overnight. It means the test has context. Strength & Conditioning (S&C) coaches use 1RM numbers as a reference for planning, not as a life score.
Where it shows up in real programs (powerlifting, CrossFit, general training)
In powerlifting, 1RM guides meet prep and keeps attempts realistic for the Squat, Bench Press, and Deadlift. In CrossFit, it often anchors strength cycles so you can build power without letting conditioning turn every session into chaos. For general training, it’s a simple way to set loads. If your estimated bench 1RM is 200 lb, “80% day” stops being guesswork.
Two ways to find your 1RM: testing vs submaximal estimation
Direct testing (what it measures, what it demands)
A true 1RM test is simple in theory: add weight until you find the heaviest single you can complete with clean technique. What you’re really testing is how well your body can coordinate force on command. That includes neuromuscular adaptation like motor unit recruitment and timing, not just muscle size. Because the lift is an isotonic contraction under a heavy load, small errors matter. A sloppy brace or a soft lockout can turn a “strong enough” attempt into a miss.
Submaximal repetition method (why most people use it)
The Submaximal Testing route uses a tough set of multiple reps, then estimates your max with a formula. It’s faster, usually safer, and easier to repeat regularly. Most lifters also get cleaner reps here, which makes the number more useful for planning.
Who should do what (beginner vs intermediate vs advanced)
Beginners should lean on submaximal estimates while technique is still improving. Intermediates can do either, but often get better week-to-week tracking from submax sets. Advanced lifters may test true singles during a peak, then use submax work the rest of the year to manage fatigue.
1RM calculation methods: the formulas you’ll see most
Epley Formula (when it tends to fit well)
The Epley Formula is one of the most common Calculation Methods because it’s straightforward and works well for many lifters in the moderate rep zone. If your set is hard but still clean, the estimate usually lines up with what you could hit as a strong single. It’s basically using an assumed 1RM-to-rep ratio that holds reasonably well when fatigue hasn’t turned the set into a grind.
Brzycki Equation (when it tends to be conservative)
The Brzycki Equation often comes out a bit lower than Epley, especially as reps climb. That’s not a bad thing. Plenty of people prefer it for day-to-day load prescription because it builds in a little caution. If your reps were close to failure or your form got shaky at the end, that conservative tilt can keep your training weights honest.
Lombardi Method and O’Conner Formula (why they exist)
The Lombardi Method and O’Conner Formula are alternatives that try to handle how different bodies fatigue across rep ranges. Some lifters are great at doubles but fall apart at ten reps, others are the opposite. These formulas exist because one curve doesn’t fit everyone, every lift, or every rep count.
Epley Vs Brzycki: A Quick, Practical Comparison
Why results differ (rep range, fatigue, form drift)
The Epley Formula and Brzycki Formula are trying to answer the same question with different assumptions, so a gap between them is normal. The biggest driver is rep range. As reps go up, fatigue builds and your bar speed changes, even if you keep pushing. Add form drift like shallower squats, a soft touch point on the bench, or a deadlift that turns into a hitch, and the set stops matching the “clean reps” the math expects. That’s where accuracy starts to slide. Some lifters also hit endurance limits sooner than others, which makes higher-rep estimates look inflated.
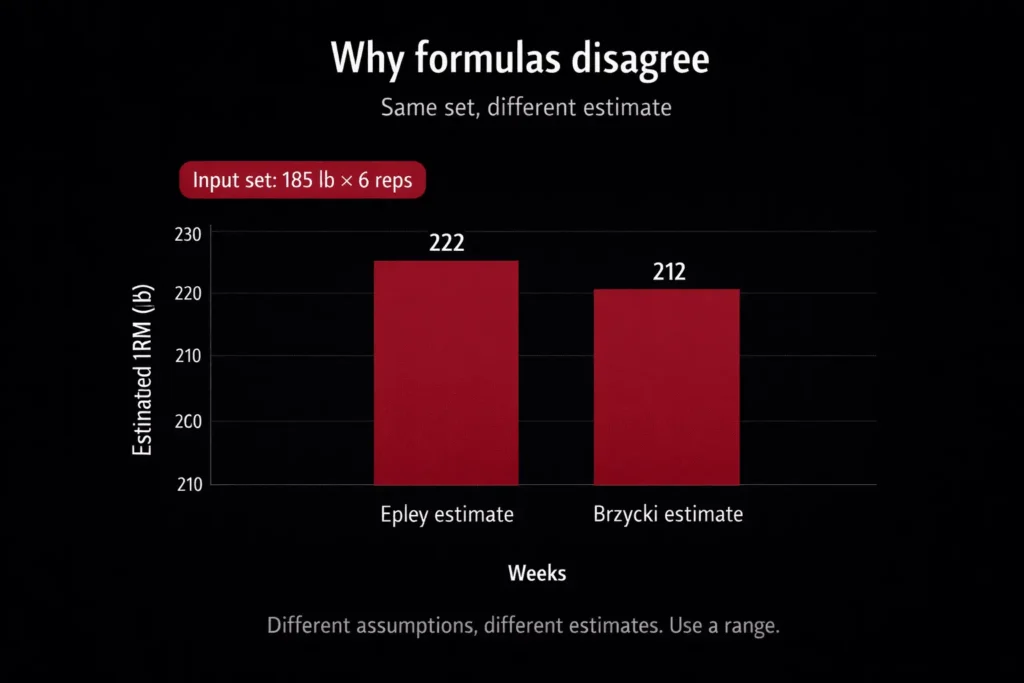
What to do when formulas disagree (use a range, then retest)
Don’t pick the higher number just because it feels better. Use a small range instead. If Epley says 245 and Brzycki says 235, plan your next training block off the middle or the lower end, then retest with a heavier set for fewer reps. A tight, hard set of 3–6 reps with consistent technique usually brings the estimates closer together and improves accuracy.
Safe 1RM testing protocol basics (without the deep dive)
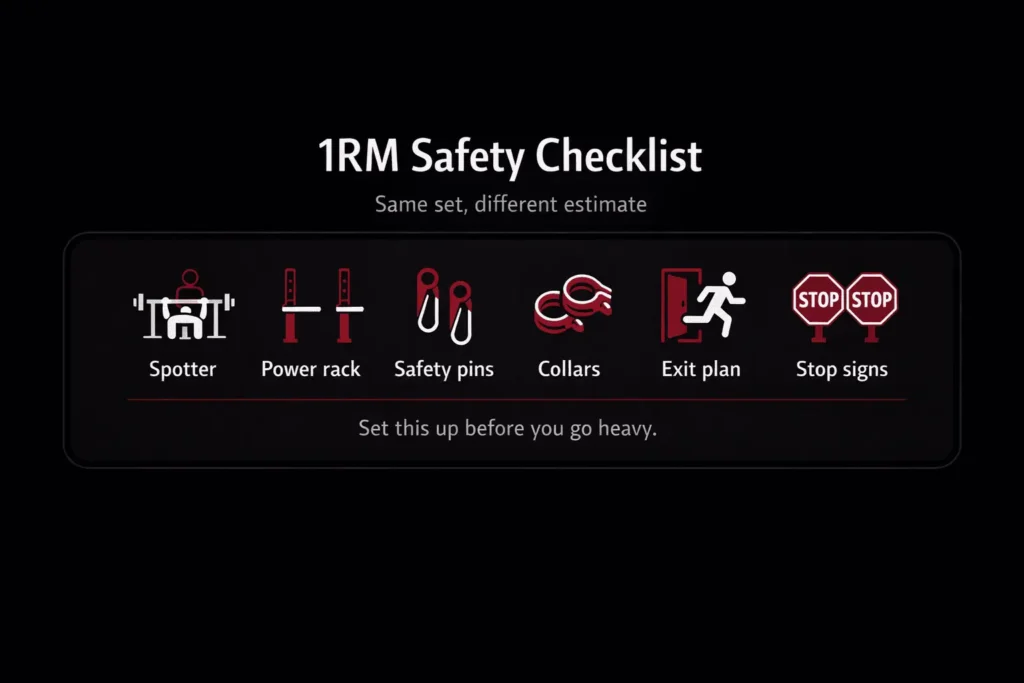
The safety checklist (spotter, rack settings, collars, exit plan)
Before you touch a heavy single, set the room up to protect you. Use a spotter for bench and squats. If you’re in a power rack, set the safety pins to a height that lets you bail out without getting pinned. Use collars on the bar, check the bench position, and decide your exit plan in advance. That’s basic injury prevention, not paranoia.
Warm-up and ramp-up overview (why the jumps matter)
A smart 1RM testing protocol starts with a specific warm-up that raises body temperature and grooves the movement, then moves into ramp-up sets that get you ready for heavy load without wasting energy. The key is making jumps that are big enough to avoid fatigue, but small enough that you don’t overshoot your max. Most misses happen because people either take too many “almost heavy” sets or jump too far and surprise themselves.
Know your stop signs (technique breakdown, pain, dizziness)
If bracing falls apart, your bar path is all over the place, or you feel sharp pain, stop. Same if you get lightheaded after a hard brace or valsalvamaneuver. A safe max is a repeatable max.
One-rep max calculator vs one-rep max chart
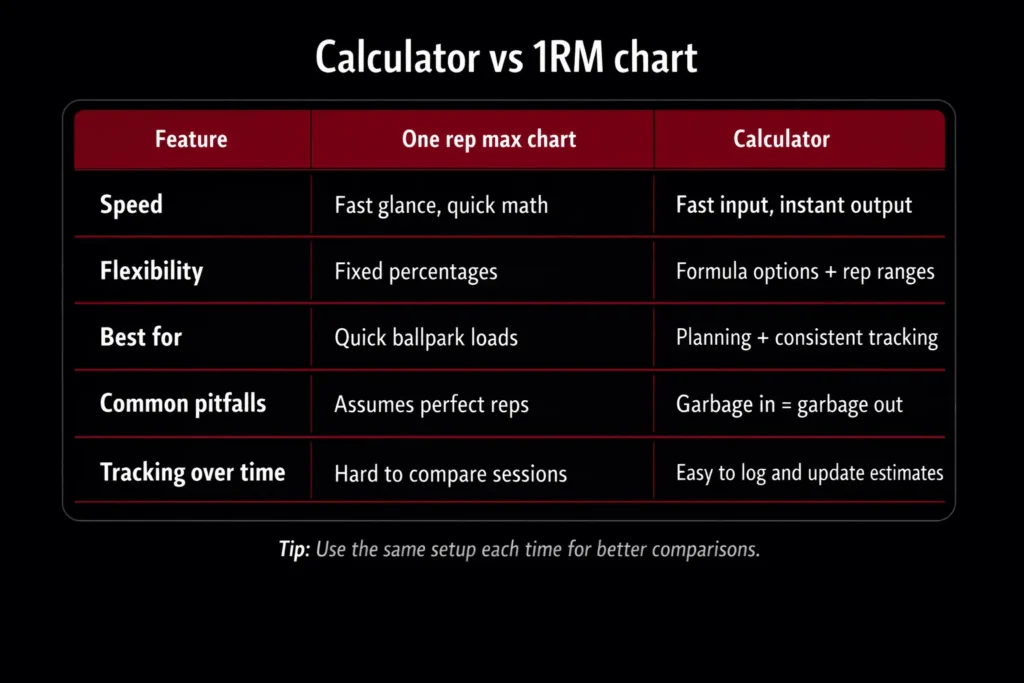
Charts are fast, calculators are flexible
A one-rep max chart gives you a quick estimate by matching reps and a percentage. The classic example is the NSCA load chart, which many coaches use for rough planning. It’s fast. You glance, do simple math, and you’re done. A calculator is more flexible because it can use different formulas and handle the way real sets look in the gym, not just a single percentage table.
When a chart is “good enough” vs when you want formulas
Charts are “good enough” when you need a ballpark load for a session, especially for beginners who are still learning consistent technique. They’re also handy when you’re coaching a group and need quick numbers. You’ll want formulas when your goal is tighter load prescription, tracking progress over time, or comparing lifts where rep performance differs. If your 8-rep sets vary a lot week to week, a calculator gives you a cleaner way to estimate and adjust without guessing.
Training percentages: how 1RM turns into weekly workouts
What percentages are really doing (intensity control)
Percentages turn a max into something you can use on a normal Tuesday. With percentage-based training, you’re controlling intensity so your sets land in the right effort zone instead of drifting into “too easy” or “too heavy.” That makes load prescription consistent. It also helps you manage training volume because the weight on the bar affects how many hard sets you can recover from. When the percentage is right, you can push effort without turning every session into a max-out.
Where RPE fits (auto-regulation without guessing)
RPE (Rate of Perceived Exertion) is the reality check. Two lifters can have the same estimated 1RM and still have different days. If 80% feels like an RPE 9 grind, you don’t force the plan. You adjust the load, the reps, or the number of sets. That’s auto-regulation, and it keeps progress moving when life happens.
Strength vs hypertrophy focus (big picture only)
Higher percentages usually pair with lower reps for strength. Moderate percentages plus more reps often drive muscle hypertrophy. The point is matching the week’s goal, not chasing a percentage for its own sake.
Calculator accuracy: what changes your estimate (and what doesn’t)
Biggest accuracy drivers (rep range, proximity to failure, tempo)
Accuracy starts with the set you enter. A clean set of 3–8 reps is usually more predictive than a 12-rep grind because the 1RM-to-rep ratio shifts as fatigue piles up. The closer you go to repetition to failure, the more form and tempo tend to change. Slower reps, longer pauses, or a last rep that turns into a shaky good-morning squat can skew the estimate. Keep tempo consistent and stop when technique is still yours, not survival mode.
Exercise differences (bench vs squat vs deadlift)
Different lifts fatigue differently. The bench press often allows more controlled rep-to-rep rhythm, while the squat can fall apart fast if bracing slips. Deadlifts are notorious for rep drop-off because each rep starts from a dead stop. Fast-twitch dominant lifters may crush heavy doubles but lose accuracy as reps climb because fast-twitch muscle fibers fatigue quickly.
Day-to-day variance (sleep, soreness, stress, caffeine)
Your estimate can swing based on recovery and readiness. Central nervous system (CNS) fatigue from hard training, poor sleep, or high stress can make a normal weight feel glued to the floor. Caffeine can help, but it can’t fix bad recovery. Track trends over weeks, not one session.
1RM vs 5RM vs 10RM: picking the right “max” for your goal
Why rep maxes matter for beginners
A RM (Repetition Maximum) is the heaviest weight you can lift for a given rep target with solid form. For beginners, rep maxes are often more useful than a true 1RM because technique is still settling in. A shaky single doesn’t tell you much. A controlled 5RM does. It also gives you a safer way to train toward absolute strength without living on the edge of failure.
Why 5RM and 10RM can be smarter during busy training blocks
Even for experienced lifters, 5RM and 10RM can be the better “max” during high-volume phases. If you’re building work capacity, chasing muscle hypertrophy, or juggling conditioning, sleep, and real life, a true 1RM isn’t always the best weekly target. A 5RM gives you heavy stimulus without the recovery cost of repeated maximal singles. A 10RM helps you build size and reinforce good positions under fatigue, which can carry over when you return to heavier training.
Best one-rep max calculator apps (and when to use them)
What to look for (form notes, PR tracking, export, percentages)
A good app does more than spit out a number. Look for solid load tracking, an easy way to log sets, and a place to note details that change the lift, like pause reps, belt use, or squat depth. PR tracking helps you spot progress without relying on memory. Export matters too. If you ever switch apps or share training with a coach, you’ll want a clean CSV or history you can pull. Built-in percentage tables are a plus, especially if you follow Strength & Conditioning (S&C) style programming that rotates intensity across the week.
When your browser calculator beats an app (simple, fast, consistent)
Apps shine when you’re logging everything. A browser calculator wins when you want speed and consistency. If you’re on a laptop or your phone between sets, it’s often faster to enter weight and reps, get an estimate, and move on. No setup, no syncing, no distractions. For many lifters, that’s the whole point.
Our tool guide: how OneRepMaxCalculators.com fits into your training
A simple workflow (estimate → plan → train → update)
Use the tool the same way you’d use a tape measure. First, estimate your 1RM from a solid working set. Next, plan your week using training percentages so your heavy, medium, and lighter days have a purpose. Then train and log what actually happened, including reps, effort, and any form notes. After a week or two, update the estimate using a fresh set and adjust your load prescription. That loop supports progressive overload without forcing you to chase max singles every time you want to confirm progress.
Who this tool is built for (beginner, intermediate, advanced)
Beginners get a safe way to set loads while technique improves. Intermediates get consistent numbers for programming and tracking. Advanced lifters get a reliable baseline for building volume, managing fatigue, and tightening up their percentage work between peaks. No matter your level, the goal is the same: turn real training data into a plan you can repeat and improve.
