Strength Training Fundamentals and Techniques
Strength training fundamentals are the non-negotiables that help you get stronger without turning every workout into a guess. This hub is built for real US gyms and real lifters, from your first barbell session to powerlifting and CrossFit-style strength work. You’ll learn the strength training basics that matter most: how to strength train with a plan, how to practice good movement competency through preparatory sets, and how to progress without rushing the process.
Your body adapts to the stress you repeat, and it also “un-adapts” when training drops off. That’s the adaptation vs. reversibility reality. The smart move is consistent, small progress that fits you. Training age matters. A true beginner needs different loading, frequency, and technique focus than someone who has been lifting for years. That’s individualization, not overthinking.
Strength Training Basics for Beginners (how to strength train without getting hurt)
If you’re new, the goal isn’t to do everything. It’s to do the right few things well, often enough, to force a real adaptation. That’s the core of strength training basics. Your body learns what you repeat, and it also gives back progress when you stop training for a while. That’s adaptation vs. reversibility in plain English. The answer is not chaos. The answer is consistency.
Strength training for beginners also has to be individualized. Your training age matters more than your motivation, and genetics can influence how fast certain lifts move. Two people can follow the same plan and progress at different speeds. That’s normal. The common thread is movement competency. You need repeatable reps with a consistent range of motion and solid control, not random reps that change every set. Preparatory sets are part of that. They’re not wasted time. They’re practices that keep you safe and make your work sets more productive.
We’ll lean on standards and ideas you’ll recognize from NSCA and ACSM, plus classic barbell culture like Mark Rippetoe’s Starting Strength when it helps. When you’re ready to put numbers behind your plan, use our 1RM Calculator to set loads, track trends, and train with intent.
The Big Rules (simple, repeatable fundamentals)
- Train the basics, on purpose. The SAID principle means you adapt to the specific demand you apply. If you want to get stronger, you need regular exposure to challenging sets in the same movement patterns, not a new workout every day.
- Earn your weight jumps. Add load when your reps look the same from set one to set three. If form changes, the weight is teaching the wrong skill. ACSM and NSCA guidance lines up with this idea. Progress is a tool, not a dare.
- Use prep sets to build good reps. Start lighter, build up, and treat those ramp-up sets like technique rehearsal. They help you find your groove and reduce ugly surprises on heavier sets.
- Recover like it counts. Beginners can progress fast, but only if they’re sleeping, eating, and not turning every workout into a max-out event. More isn’t always better. Better is better.
What “Progress” Actually Means (strength, muscle, skill)
Most people think progress means adding weight every week forever. That’s part of it early on, but it’s not the whole story. Real progress has three lanes.
Lane one is strength. You’re improving your ability to produce force in a specific lift. A cleaner, faster rep at the same weight is progress. So is doing the same weight for more reps with the same form.
Lane two is muscle. Hypertrophy comes in different “flavors.” Myofibrillar growth is more about contractile tissue that supports force production. Sarcoplasmic growth is more about the stored fuel and fluid that supports higher training volumes. You don’t need to obsess over the labels, but it helps to understand why higher-rep work and enough total sets matter.
Lane three is skill. This is the hidden accelerator. As your nervous system gets better at motor unit recruitment and timing, you waste less energy and lift more efficiently. That’s neuromuscular efficiency, and it’s a big reason beginners can improve quickly even before they add much muscle. Researchers like Brad Schoenfeld and William J. Kraemer have helped clarify how training variables drive strength and hypertrophy, but the practical takeaway is simple. Don’t chase weight at the expense of repeatable, high-quality reps. The skill you build now is what lets you get stronger later without getting hurt.
Progressive Overload Strength (the engine of long-term gains)
Progressive overload strength is the simple idea that your body needs a slightly harder job over time if you want it to keep adapting. If the training stress stays the same, your results level off. If the stress jumps too fast, form breaks down and recovery collapses. The “sweet spot” is small, repeatable progress that matches your training age.
This ties directly to the SAID principle. You get better at the specific work you practice. If your goal is to get stronger on the barbell lifts, your plan needs regular exposure to those patterns with enough challenge to force adaptation. Then you repeat that exposure consistently, because reversibility is real. When training becomes inconsistent, strength skill fades quicker than most people expect, especially in technically demanding lifts.
A smart progression is also individualized. Two lifters can do the same program and progress at different speeds. That doesn’t mean one is doing it wrong. It means their recovery, leverage, stress, and training history are different. Your job is to keep the stimulus climbing without turning every session into a survival test.
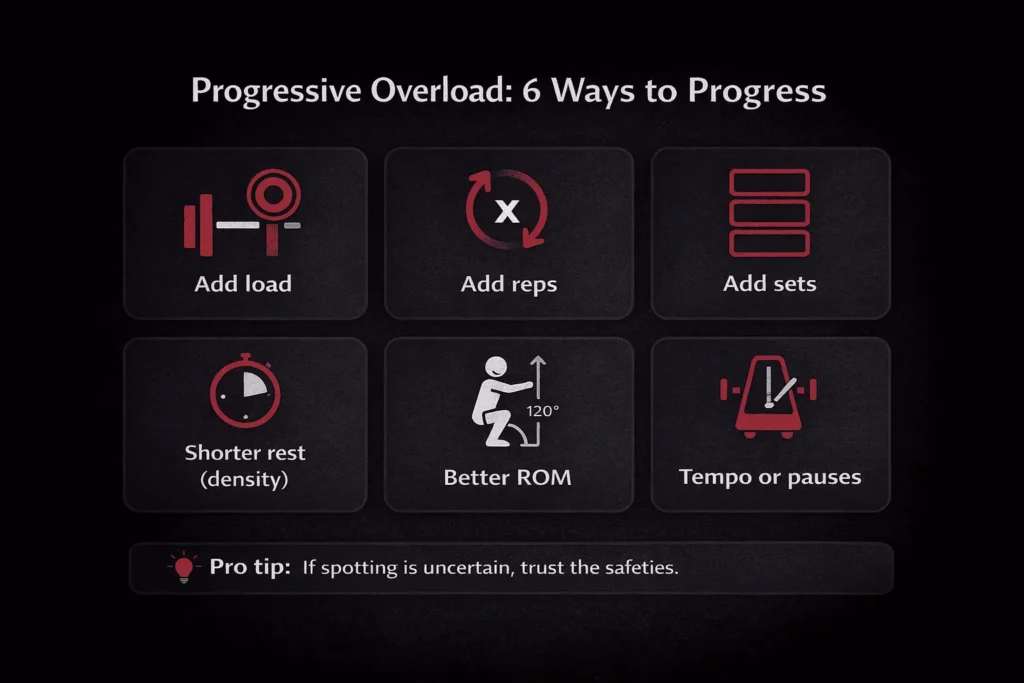
What counts as overload (beyond adding weight)
Adding weight is the most obvious lever, but it’s not the only one. Overload can come from morereps with the same load, moresets at the same reps, or better work quality at the same workload. If your range of motion improves and stays consistent, that can be overload too, because the lift becomes harder in the right way. Tempo is another lever. A controlled eccentric or a brief pause can increase difficulty without touching the plates.
Intensity indicators help you keep this organized. You can use 1RM-based percentages for percentage-based training (PBT), and you can pair that with RPE or RIR to manage fatigue. For example, a set at 75% of your estimated 1RM might feel like RPE 7 one week and RPE 9 the next depending on sleep, stress, and soreness. That’s why NSCA-style thinking emphasizes both planned loading and autoregulation. You’re not guessing. You’re adjusting based on what you can actually execute well today.
The most common beginner error: progress too fast (or not at all)
Beginners usually miss on one of two extremes.
The first is ego jumps. It shows up as adding 10–20 pounds because last week felt good, even though the reps got slower, depth got shorter, or the bar path got messy. You might still complete the set, but you practiced bad reps. This is a common gym myth in disguise: “If I completed it, it counts.” It counts, but it might be teaching the wrong thing. Mark Rippetoe’s barbell culture message gets quoted a lot here, and the useful part is this: the lift has standards, and you don’t get to ignore them just because the plates look cool.
The second extreme is never progressing. People repeat the same weights for months because they don’t track, they don’t plan, or they’re always “waiting to feel ready.” ACSM-style guidance is simple. When you can complete the target reps with clean form and a reasonable effort, you earn a small increase. Track your sets, pick one progression method, and let consistency do the heavy lifting.
Training Volume vs Training Intensity (what they mean in the real gym)
Training volume and training intensity are the two knobs you turn to drive progress. If you understand them, you stop guessing and start making deliberate choices about how to get stronger. Training volume is the total amount of work you do, usually thought of as sets and reps, and sometimes sets times reps times load. Training intensity is how hard the work is, often tied to load as a percentage of your 1RM or how close you are to failure.
Here’s the practical payoff. Volume is the main driver of practice and growth. Enough volume gives you repeated high-quality reps, and it supports muscle hypertrophy through the repeated “signal” of training and recovery, including muscle protein synthesis (MPS). Over time, that can show up as myofibrillar growth that supports force, and sarcoplasmic changes that support higher workloads. Intensity is the main driver of skill under heavy load. Higher intensity improves neuromuscular efficiency, meaning better motor unit recruitment and timing. It is also the faster way to expose weak links in technique.
Fatigue management is the bridge between them. Push volume too high and DOMS can wreck your next session. Push intensity too high and form can fall apart. Brad Schoenfeld and William J. Kraemer are often cited in this space for separating what drives strength and what drives size, but the gym-level takeaway is simple. Match volume and intensity to your goal, your recovery, and your training age.
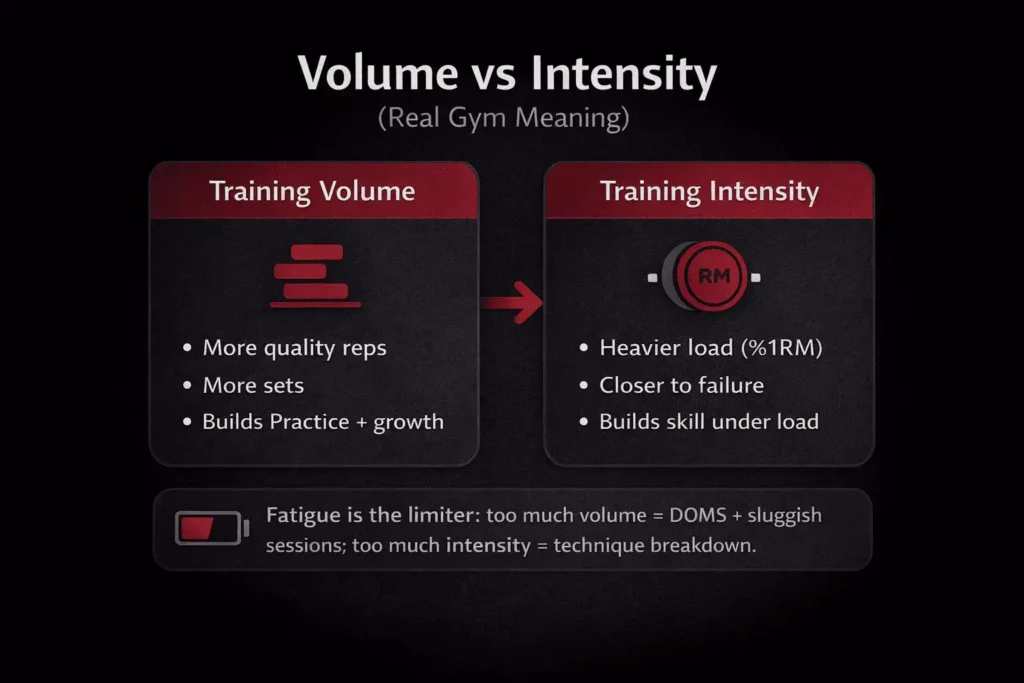
Simple definitions + 2-minute mental model (volume drives practice; intensity drives skill under load)
Think of training volume as your total practice time for a lift. More good reps, across more sets, builds consistency and confidence. Think of training intensity as how heavy the reps are relative to your current capacity.
Under the hood, intensity asks your nervous system to coordinate a lot at once. As load rises, neuromuscular efficiency matters more, including motor unit recruitment and how smoothly you can express force. Muscle actions matter too. The eccentric portion can add fatigue, the concentric tests pure drive, and brief isometrics can expose weak positions.
NSCA-style coaching tends to treat this as a balancing act. Volume builds the base. Intensity sharpens the peak. Most lifters need both.
Beginner-friendly ranges (sets/reps/rest) that don’t fry you
A practical starting point for strength training basics is 2–4 working sets of 6–10 reps on your main lifts, with 1–3 minutes of rest depending on how hard the sets feel. Keep 1–3 reps in reserve on most sets, especially early. That gives you enough training volume to learn the movement while protecting recovery.
Use preparatory sets to get there. Do a few lighter ramp-up sets to lock in range of motion and bracing before you touch your working weight. If DOMS is extreme or your reps slow down fast, pull back slightly on volume before you start chasing heavier loads.
ACSM and NASM frameworks both emphasize sustainable progression and technique consistency. Beginners usually do better with repeatable sessions than with heroic sessions.
“If this, then that” adjustments (add load vs add reps vs add sets)
- If you hit all reps with clean form and still had 2 reps left, add a small amount of load next time.
- If form is solid but the set felt close to failure, keep the load and add 1 rep per set next time.
- If you recover well but your strength is flat, add one set before you add more intensity.
- If fatigue piles up or soreness lingers, reduce volume for a week instead of forcing progressive overload strength.
Workout Frequency (how many days per week to lift for strength)
Workout frequency is one of the fastest ways to make strength training feel either easy to recover from or impossible to sustain. The right answer depends on your training age, your schedule, and how well you recover. The SAID principle still applies. You need enough exposure to the lifts to adapt, and you need enough recovery to keep that adaptation moving forward. If you disappear for weeks, reversibility shows up quickly. If you train hard every day, fatigue management becomes the limiting factor, especially if you also do CrossFit-style conditioning.
Frequency by training age (beginner → intermediate → advanced)
For strength training for beginners, 2–3 lifting days per week is usually plenty to progress while learning technique. Intermediates often do well on 3–4 days. Advanced lifters may handle 4–5+ days, but only with smarter intensity control. ACSM and NASM frameworks both push the same idea: start with what you can recover from, then earn more frequency.
Full-body vs split routines (what fits a US commercial gym schedule)
Full-body training works well when you lift 2–3 days per week, and it fits the Starting Strength style of repeated practice. Splits can work when you train more days, but they demand more planning so you don’t lose movement competency. If your gym is crowded, dumbbells and kettlebells can keep a split or full-body day moving without waiting on a rack.
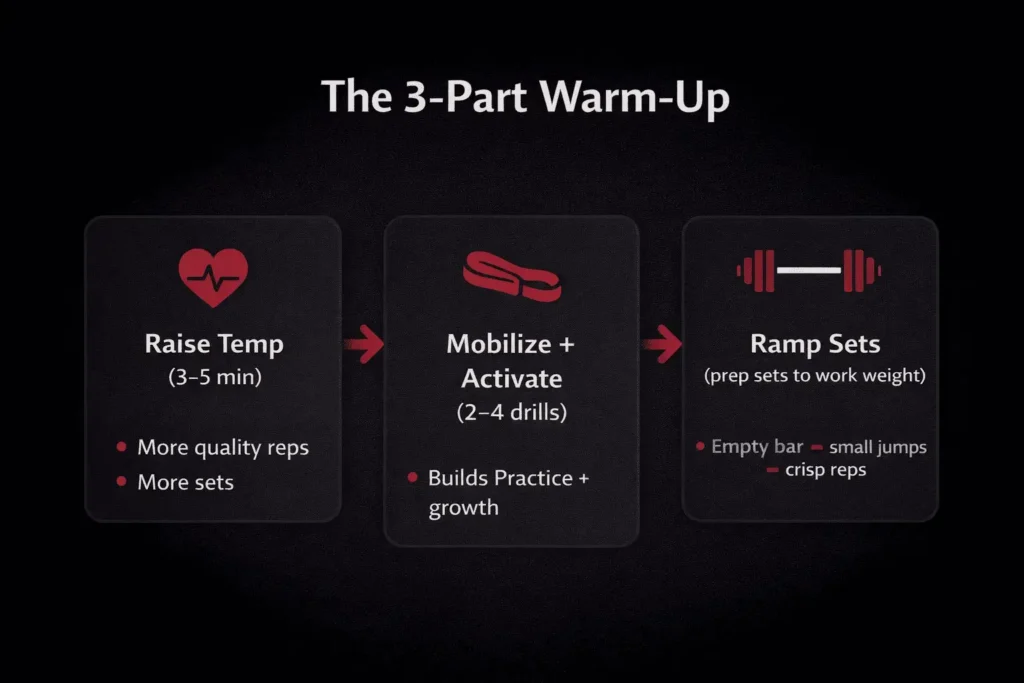
Warm-Up + Mobility (prep your joints, groove your pattern, lift better)
Warm-up exercises weightlifting are not filler. They’re the bridge between walking in cold and lifting with clean, repeatable technique. A good warm-up improves movement competency, protects your range of motion, and helps you hit strong reps without “testing” your joints on the first heavy set. It also helps you set a technical failure threshold. You notice early if something feels off, and you adjust before you load it. That matters for weightlifting safety.
Keep it simple and repeatable. Use the same structure whether you’re lifting with an Olympic barbell, kettlebells, or resistance bands. The goal is not to get tired. The goal is to get ready.
The 3-part warm-up: raise temp → mobilize → ramp sets
- Raise temperature: 3–5 minutes of easy movement so you’re warm and breathing a bit harder.
- Mobilize and activate: quick drills that match the lift, like hip openers, shoulder circles, or band pull-aparts.
- Ramp sets: preparatory sets that build toward your working weight. With a barbell in a power rack, start with the empty bar, then add bumper plates in small jumps. Keep the reps crisp and consistent, especially on the eccentric.
Mobility “minimum effective dose” (what matters for squat/press/pull)
Mobility should solve a problem, not become your whole workout. If you can’t hit depth in a squat, address ankles and hips. If pressing feels tight, open the upper back and shoulders. Two to four drills, 30–60 seconds each, is usually enough before lifting. Use resistance bands for quick shoulder work, or a light kettlebell for controlled goblet squat holds. The best mobility plan is individualized. You focus on the joints that limit your range of motion, then you lift.
Weightlifting Techniques and Biomechanics (the principles behind good form)
Good weightlifting techniques are not a list of cues you memorize once. They’re repeatable principles that protect your joints and let you express strength on demand. When you learn how to strength train with solid mechanics, you waste less energy, you move weight more efficiently, and your hard sets become safer. That’s the link between technique and weightlifting safety.
At a high level, you’re building movement competency. You use preparatory sets to groove the pattern, then you repeat the same range of motion under load. Muscle actions matter. The eccentric teaches control, the concentric tests drive, and brief isometrics expose weak positions. Over time, your nervous system gets better at timing and motor unit recruitment, which is why technique can add strength even before you add much muscle. These principles apply whether you’re using an Olympic barbell, dumbbells, or training in a power rack with safety pins. Organizations like USAW and NSCA treat technique as a skill, not an afterthought.
Bracing, breathing, and “stacking” (spine safety + power transfer)
Bracing is the foundation. You create full-torso tension, then you keep your ribs and pelvis “stacked” so force goes into the bar, not into spinal motion. Your breath supports that brace, especially on heavier work near your 1RM. This improves neuromuscular efficiency because your body can recruit force without leaking stability. Nicholas Ratamess and NSCA-style coaching both emphasize that strong lifts start with a stable base, even before the bar moves.
ROM consistency + tempo control (why “same rep” beats “random rep”)
A consistent range of motion keeps the lift honest and makes your progress measurable. Tempo matters too. A controlled eccentric and a brief pause where needed build position strength and can support hypertrophy through repeated tension and MPS. Brad Schoenfeld’s work often highlights that quality volume adds up. Sloppy reps don’t.
Compound movements first (back squat, bench press, deadlift)
Back squat, bench press, and deadlift anchor most strength plans because they deliver the most return for your effort. The SAID principle shows up here. Practice these patterns and you build limit strength and skill that carry into other training, including USAPL and IPF meet-style lifting.
Powerlifting vs CrossFit emphasis (skill under fatigue vs maximal execution)
Powerlifting rewards maximal execution under controlled conditions, like a clean single with strict standards. CrossFit often demands good technique under fatigue, including explosive power and fast force development. If you just did Fran, your next barbell set needs smarter loading and tighter frequency control. USAPL or USPA lifters can usually separate stressors more cleanly.
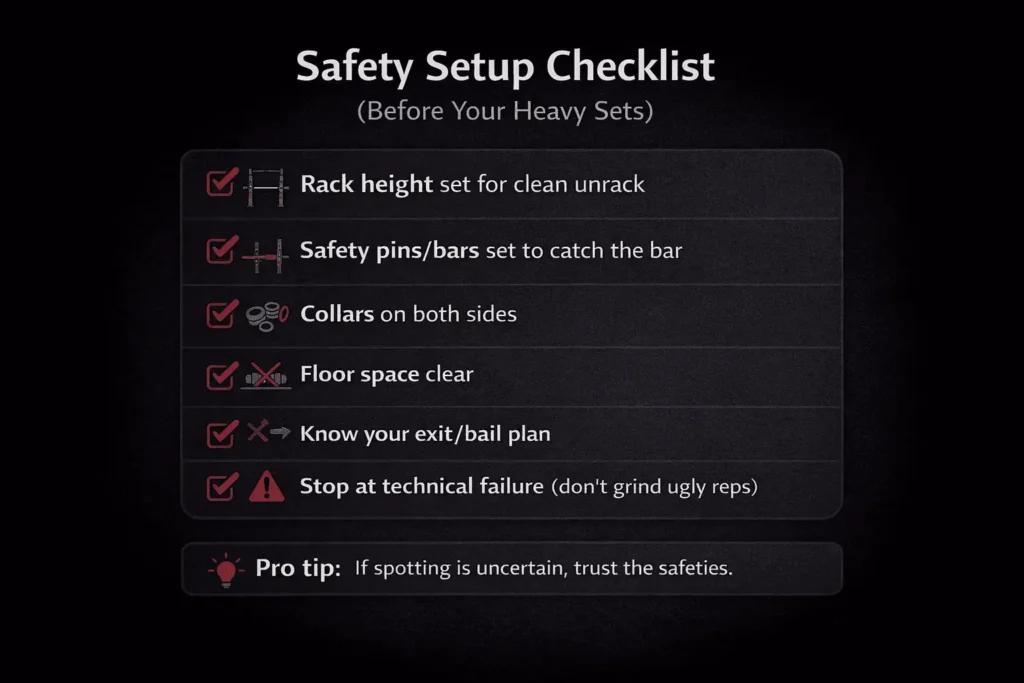
Weightlifting Safety (spotters, racks, technical failure, and bailing)
Weightlifting safety is not just “be careful.” It’s a setup and a decision rule. If you’re new, you need a consistent way to know when a rep is no longer worth grinding. That’s a technical failure threshold. When technique breaks, the set is done, even if you could still force the bar up. Fatigue management matters here. RPE and RIR help you stay out of panic reps while you build movement competency. Use a power rack, set your safeties, and treat every heavy set like it has a plan.
The safety setup checklist (rack height, pins/bars, collars, space)
Set the rack height so you can unrack cleanly without a calf raise. Set safety pins or bars to catch the Olympic barbell if you miss. Use collars every time, and keep the floor clear. If you’re using bumper plates, make sure you have space to lower safely without hitting people or equipment.
Spotting basics (bench + squat) and when not to spot
A spotter helps you finish safely, not “curl” the bar for you. On bench, hands hover close and the lifter controls the rep. On squat, a spotter stays ready but doesn’t interfere unless the rep stalls. In a crowded gym, NSCA-style guidance and USAPL meet culture both favor rack safeties as the safer default when spotting is uncertain.
Bailing 101 (how to fail a lift safely)
Practice the exit before you need it. In a power rack, trust the safeties and let the bar settle. With bumper plates, control the drop and step clear, don’t twist or jump unpredictably. The goal is a calm miss, not a scramble.
Recovery and Deload (how to keep training without stalling)
Recovery and deload work is where strength actually sticks. Training is the signal. Recovery is the adaptation. If workout frequency and training volume climb without enough sleep and stress control, fatigue stacks up, DOMS lingers, and your numbers stall. That’s not weakness, it’s biology. Individualization matters too. Some lifters bounce back fast. Others need more spacing, especially as loads rise. ACSM and NSCA frameworks both treat recovery as part of the program, not something you hope happens.
The recovery stack (sleep, nutrition, stress, steps)
Keep it measurable. Aim for consistent sleep, enough protein and total calories to support training, and a baseline of daily movement like steps. Manage stress where you can, because high stress often shows up as higher RPE at the same weights. Recovery and deload planning starts with these basics.
What a deload is (and how to do it without “losing gains”)
A deload is a planned microcycle where you reduce stress so your body can rebound. You can drop training volume, lower intensity, or both, then return to normal work feeling sharper. You won’t lose gains in a week. You usually protect progress by timing deloads before you burn out, which is a core idea in periodization for strength.
Red flags you need a deload (performance, mood, aches, sleep)
If the same weights feel heavier, reps slow down, and your RIR disappears, pay attention. Add in poor sleep, low motivation, and joint aches that don’t warm up, and it’s a common gym mistakes moment. Take the hint, back off for a week, and come back ready to push again.
Periodization for Strength (simple overview that doesn’t melt your brain)
Periodization for strength is just structured change over time. Instead of pushing the same workout frequency and training intensity forever, you cycle stress so you can keep adapting and avoid reversibility from burnout or long layoffs. The SAID principle still drives the plan. You get good at what you practice, so the phases should match your goal. NSCA coaches and researchers like Nicholas Ratamess often describe periodization as a way to manage fatigue while building toward performance. USAW and USAPL or IPF lifters use it in different ways, but the logic is the same.
Macrocycle → mesocycle → microcycle (how plans are actually built)
A macrocycle is the big picture, often months. A mesocycle is a focused block, often 4–8 weeks. A microcycle is the weekly plan. Individualization matters because your timeline depends on training age, recovery, and schedule. NSCA and ACSM language tends to use these terms consistently, so learning them helps you read programs correctly.
Linear vs undulating vs block (what changes week to week)
Linear usually shifts from higher volume to higher intensity over time. Undulating changes reps and intensity more frequently, sometimes day to day. Block focuses on one quality at a time. USAPL peaking culture often leans toward clear phases, while USAW tends to cycle intensity more often.
The “most lifters need this” version (simple 4–8 week blocks)
Pick one main lift focus, build with steady progressive overload, then run a lighter week. Repeat. That simple mesocycle approach covers strength training basics without turning planning into a second job.
RPE Scale Lifting + RIR + Fatigue Management (autoregulation basics)
RPE scale lifting is a simple way to control training intensity without pretending every day feels the same. Instead of forcing a percentage no matter what, you match the load to the effort you can execute with good form today. That’s fatigue management in practice. RIR helps too. It keeps you honest about how close you are to technical failure thresholds, which is where reps start getting risky. You can still use intensity indicators like your 1RM and percentage-based training (PBT), and some lifters track velocity-based training (VBT) with tools like linear position transducers or force plates, but you don’t need gadgets to start. NSCA coaching principles fit well here because they balance planning with real-time adjustment.
RPE and RIR (what the numbers mean)
RPE tells you how hard a set was. RIR tells you how many clean reps you had left. An RPE 8 usually means about 2 reps in reserve. An RPE 9 is about 1 rep left. An RPE 10 is a true max effort with no clean reps left. If your technique breaks early, stop there. That technical failure threshold matters more than grinding. Nicholas Ratamess and many practical coaching systems treat this as the key difference between smart hard sets and sloppy hard sets.
Percent-based training (PBT) vs autoregulation (when each works best)
PBT works great when your estimated 1RM is current and your recovery is stable. Autoregulation helps when sleep, stress, or soreness changes the day. They can work together. Plan a percentage range, then use RPE to land on the right load. VBT tools like LPTs or force plates can add precision, but the goal is the same: match training intensity to what you can repeat and recover from.
CrossFit reality: strength work when you’re already fatigued
After Fran, Murph, or Helen, your “normal” weights can feel heavier. Use RPE scale lifting to avoid turning a strength session into a bad-form grind. If effort spikes early, lower the load, keep reps crisp, and prioritize recovery and deload decisions over ego.
Lifting Gear Guide (belts, sleeves, straps: what helps and what’s hype)
A lifting gear guide should start with one rule. Gear supports good movement. It can’t replace it. In a normal gym, the best “equipment upgrade” is still a consistent setup, solid bracing, and safe lifting habits in a power rack. Gear becomes more useful as loads rise and technique is stable, especially when you’re pushing heavier intensity work. If you’re missing depth, losing position, or cutting range of motion, gear can hide the real problem. Treat it as a tool for weightlifting safety and repeatable weightlifting techniques, not a shortcut.
Belts (what they do, who should use them, how tight)
A belt helps you brace harder by giving your torso something to push against. That can improve stiffness and force transfer on heavy squats and pulls with an Olympic barbell. In USAPL and IPF-style lifting, belts are common, but they work best after you already know how to brace. Tight should mean “secure and supportive,” not “can’t breathe.” If form breaks before the belt helps, the set is past your technical failure threshold.
Sleeves, wraps, straps, shoes, chalk (quick picks by goal)
Knee sleeves can keep joints warm and add confidence. Wrist wraps can help pressing comfort. Straps can help pulling volume when grip is the limiter, but don’t let them erase grip training forever. Shoes can improve stability and range of motion. Chalk is simple and effective. If your gym setup forces dumbbells, kettlebells, or bumper plates, pick gear that keeps positions consistent and reps clean.
Common Gym Mistakes (and the fast fixes that actually work)
Common gym mistakes usually look like effort, but they don’t follow the SAID principle. Random workouts don’t build repeatable strength skill. Ego jumps skip progressive overload and replace it with chaos. And when fatigue piles up, reversibility shows up as stalled numbers and cranky joints. In US gyms, people chase the NFL Scouting Combine 225 bench vibe without the base. Starting Strength-style consistency plus NSCA-level basics fix most of this fast.
Beginner mistakes (random workouts, ego loading, skipping warm-ups)
The big three are simple. Stop changing your plan daily. Use small weight jumps and keep reps consistent. Warm up with an Olympic barbell or dumbbells, then lift in a power rack with safety protocols in place. Your goal is clean reps you can repeat next week.
Intermediate mistakes (too much junk volume, no deloads, no plan)
More stops working when it’s unplanned. Junk volume inflates fatigue without adding useful practice. Use mesocycles, schedule recovery and deload weeks, and match volume to what you can recover from. Kraemer and Schoenfeld’s work supports the idea that quality work beats endless work.
“Test day” mistakes (maxing too often, sloppy attempts)
Testing 1RM too often turns training intensity into a circus. If technique breaks, the attempt is already a loss. Follow meet-style standards like USAPL or IPF and save true maxes for planned phases, not weekly impulses.
Fundamentals by Goal (Powerlifting vs CrossFit vs Strength + Physique)
Same fundamentals, different priorities. The SAID principle still applies, but the way you manage training intensity, training volume, and workout frequency changes with the sport. USAPL, USPA, and IPF lifters build around predictable attempts and standards. USAW influence shows up when speed and bar control matter. CrossFit benchmark WODs like Fran, Murph, and Helen can also change what “recovered” looks like.
Powerlifting-first (limit strength, consistent comps lifts, peaking mindset)
Put most of your weekly effort into the competition lifts and the positions you get judged on. Treat your 1RM and PBT as planning tools, then build through macrocycles, mesocycles, and microcycles so heavy days land when you need them. Clean reps beat ugly grinders. That’s how totals move.
CrossFit-first (strength + conditioning, technique under fatigue)
You’re rarely fresh, so fatigue management becomes part of technique. Use RPE scale lifting and RIR to keep strength work honest on days conditioning already hit you. If bar speed and crisp positions disappear, lower the load. Kettlebells and mixed sessions are fine, but they demand smarter recovery and deload timing.
General gym-goer (strength + physique, consistency wins)
Most people get stronger by repeating good work, not by chasing perfect programming. Pick lifts you can progress with solid form, keep training volume high enough to grow, and choose loads you can recover from. Dumbbells and machines are great when they let you train hard with stable positions. NASM-style basics fit because they’re sustainable.