% of 1RM Calculator
Find your training weights for any percentage — from warm-up to max effort.
Enter your one-rep max for any lift.
The weight you want to calculate the percentage for.
You have a 1RM. Now you need to know what to put on the bar for every working set. This 1RM percentage calculator takes that maximum and generates your complete training weight reference across every intensity zone instantly. It's the complement to the one rep max calculator: where that tool gives you your 1RM from a training set, this one maps that number into actual working weights. Enter your number and use the three modes depending on what you need.
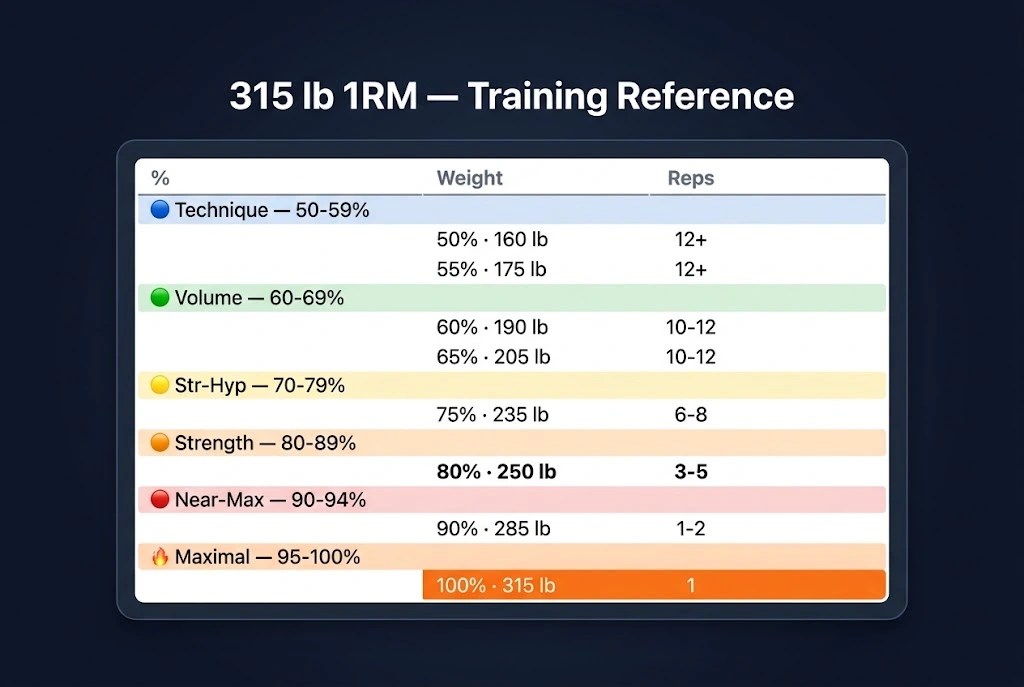
What the % of 1RM Calculator Does
| Feature | What it does |
| 📊 Full Table Mode | 18-row reference table from 50% to 100%, grouped by training zone |
| 🔍 Find Weight Mode | Enter a target percentage and get the exact training weight to load. |
| 📐 Find % Mode | Enter a weight and find out what percentage of your 1RM it represents. |
| 🎯 Quick-Select Buttons | One-click buttons for the 8 most common percentages (60–95%) |
| 🏋️ Training Zones | 6 color-coded zones with descriptions and typical rep ranges |
| 📍 Nearby Percentages | Shows 5 surrounding table entries for context in Find Weight and Find % modes |
| ⚙️ Rounding Options | Choose 5 lb, 2.5 lb, 1 lb, or Exact (lb) / 2.5 kg, 1.25 kg, 1 kg, or Exact (kg) |
| ⚖️ lb / kg Units | Switch between pounds and kilograms; rounding options update to match |
| 🔄 Auto-Recalc | In Full Table mode, the table updates live as you type (300 ms debounce). |
| ⚠️ Over-Max Warning | Find % mode warns if the entered weight exceeds your 1RM. |
| 📖 Training Zone Guide | Accordion reference listing all 6 zones and their training goals |
| ⬇️ PDF Export | Downloads a formatted training reference as a PDF, generated in the browser |
| Clean print view of your results. | |
| 🔗 Cross-Link | Link to the One Rep Max Calculator for users who need to estimate their 1RM first. |
| 📱 Mobile-Friendly | Fully responsive; stacks cleanly on small screens |
| ♿ Accessible | Keyboard navigable, ARIA-labelled, focus indicators on all interactive elements |
Three modes cover every use case: Full Table for a complete training reference, Find Weight for a quick single-percentage lookup, and Find % for reverse-engineering a load. The training zone labels tell you what each weight is actually for: the training stimulus, not only the percentage it represents.
How to Use the % of 1RM Calculator?
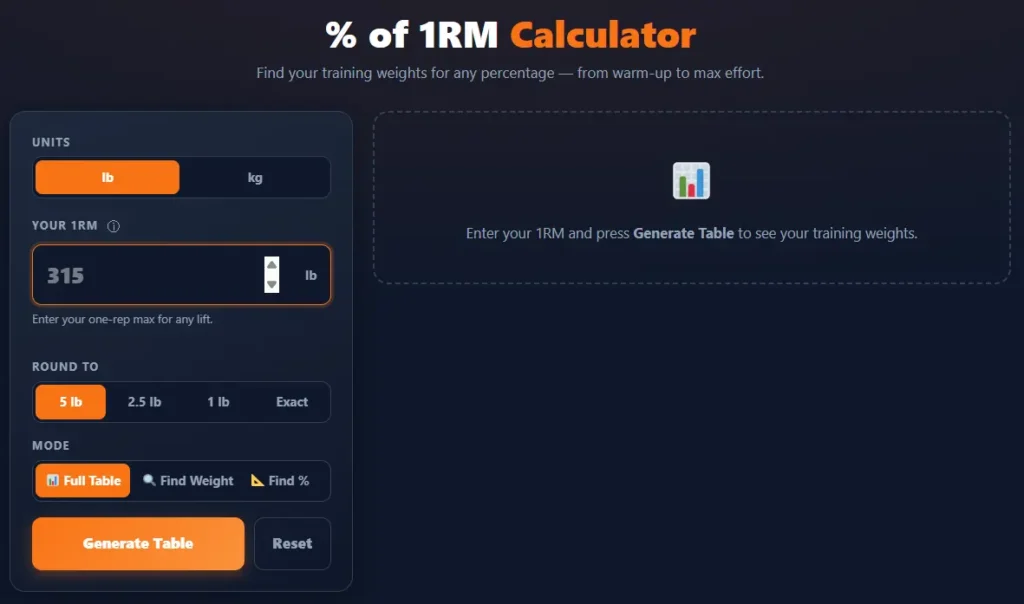
Step 1: Select Units
Choose lb. or kg. When you switch: all suffixes and placeholders update immediately, the rounding segment resets to the default for the new unit (5 lb. becomes 2.5 kg), but the 1RM field is NOT auto-converted. Re-enter your value in the new unit. Results recalculate automatically if already showing. There is no exercise or sex selector; enter in whichever unit matches how you track your lifts.
Step 2: Enter Your 1RM
Enter the maximum you can lift for one clean, full-range repetition on a specific lift. If you don't have a tested 1RM, use the one rep max calculator to estimate one from a multi-rep set, then return here. For accuracy guidance, see How Accurate Are 1RM Calculators? Maximum accepted value is 2,000 in either unit.
Step 3: Choose a Rounding Option
Choose how calculated weights are rounded to practical bar-loading increments. The options depend on your selected unit:
- Standard (5 lb / 2.5 kg): recommended for most lifters; rounds to the nearest common plate increment
- Fine (2.5 lb / 1.25 kg): for lifters with fractional plates
- Minimal (1 lb / 1 kg): for lifters using small-increment plates or tracking precise loads
- Exact: returns unrounded values to 1 decimal place for use in programming software or spreadsheets
The rounding option applies across all three modes.
Step 4: Select Your Mode and Calculate
Choose one of three modes: Full Table, Find Weight, or Find %. Each solves a different practical problem, detailed in the sections below. Press Calculate or press Enter in any input field. In Full Table mode after the first calculation, the table updates live as you type your 1RM without pressing Calculate again.
Full Table Mode: Your Complete Training Reference
The 18 Standard Percentages: Why Half-Steps Are Included
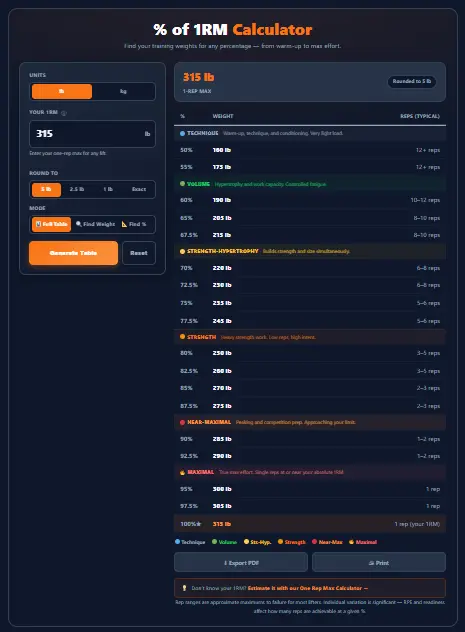
The full table includes 18 percentages rather than simple 10% increments. The 18 values are
50, 55, 60, 65, 67.5, 70, 72.5, 75, 77.5, 80, 82.5, 85, 87.5, 90, 92.5, 95, 97.5, 100
The half-step values in bold (67.5%, 72.5%, 77.5%, 82.5%, 87.5%, 92.5%, 97.5%) appear in percentage-based programs that progress by 2.5% per cycle, Jim Wendler's 5/3/1 program chief among them. Without these entries, lifters on such programs would need to interpolate manually between standard 5% increments. Their inclusion makes the table directly usable for 5/3/1 and similar programs without any additional calculation.
How do training zones group the table?
The table is organized into 6 labelled zones with color-coded section headers rather than a flat list of 18 rows. Each zone groups related percentages with a descriptor (Volume, Strength, or Maximal) and a typical rep range. This organization makes the table scan able: a lifter planning a hypertrophy block can jump straight to the green volume zone (60–69%) without reading the whole table. The 100% row (your 1RM) is highlighted in orange and always appears at the bottom, marking your ceiling for the current training block.
Auto-Recalc: Live Updates as You Type
In Full Table mode, the table regenerates automatically 300 milliseconds after the last keystroke in the 1RM field. You can type your 1RM and watch the table update in real time without pressing Calculate after the first result. This is useful for quickly comparing what happens to your training loads if your 1RM changes: type a higher or lower value and the entire table adjusts instantly.
Find Weight Mode: Pinpoint Any Training Load
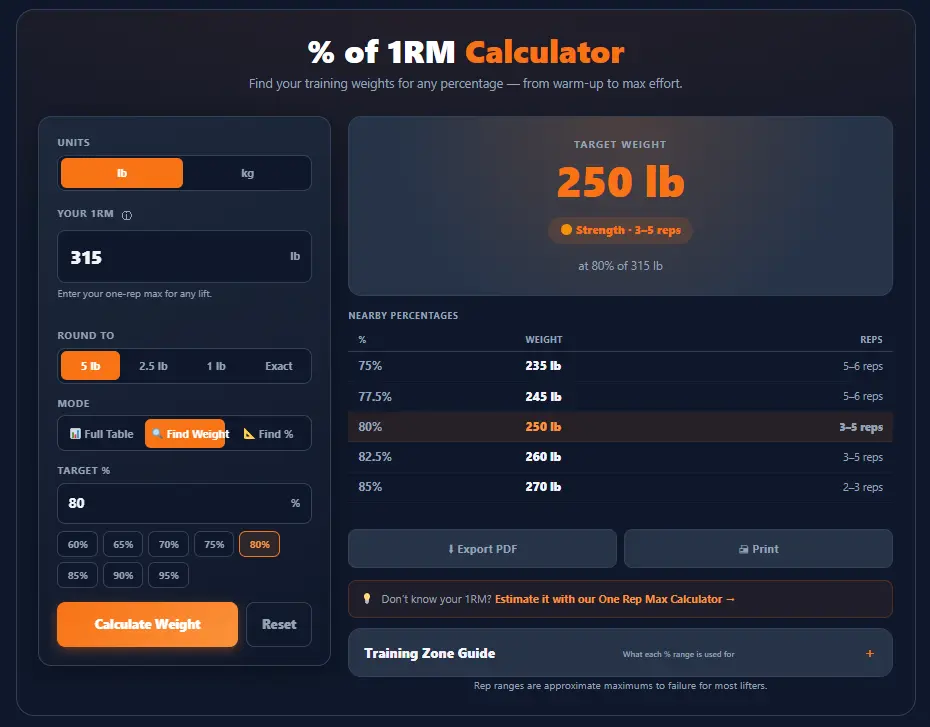
Quick-Select Buttons for Common Percentages
Below the Target % input, 8 quick-select buttons provide one-click access to the most commonly programmed percentages: 60% · 65% · 70% · 75% · 80% · 85% · 90% · 95%. Clicking any button sets the Target % field, highlights the button as active, and triggers the calculation automatically (provided the 1RM is valid). Typing a matching percentage highlights that button automatically; typing a non-standard percentage (such as 82.5%) removes the highlight without causing an error.
Typing a Custom Percentage
Any percentage between 1 and 100 is valid, with decimals allowed. Type 82.5 for a 5/3/1 top set, 67.5 for a back-off volume set, or 77.5 for a specific program prescription. The target percentage field accepts full precision; you aren't limited to the 8 quick-select values. The result shows the exact weight for your percentage, the training zone it falls in, and the typical rep range for that zone.
Reading the Nearby Percentages for Context
After calculating a specific percentage, the 5 Nearby Percentages table shows the 5 entries from the standard 18-entry table closest to your target, with your target row highlighted. This context helps when your exact percentage isn't a standard increment: seeing the surrounding rows lets you decide whether to round up to the next standard percentage or use the exact value. All 5 rows show weight (rounded to your selected increment) and typical rep range.
Find % Mode: What Percentage Is That Weight?
Quick-Select Buttons for Common Percentages
Below the Target % input, 8 quick-select buttons provide one-click access to the most commonly programmed percentages: 60% · 65% · 70% · 75% · 80% · 85% · 90% · 95%. Clicking any button sets the Target % field, highlights the button as active, and triggers the calculation automatically (provided the 1RM is valid). Typing a matching percentage highlights that button automatically; typing a non-standard percentage (such as 82.5%) removes the highlight without causing an error.
Typing a Custom Percentage
Any percentage between 1 and 100 is valid, with decimals allowed. Type 82.5 for a 5/3/1 top set, 67.5 for a back-off volume set, or 77.5 for a specific program prescription. The target percentage field accepts full precision; you aren't limited to the 8 quick-select values. The result shows the exact weight for your percentage, the training zone it falls in, and the typical rep range for that zone.
Reading the Nearby Percentages for Context
After calculating a specific percentage, the 5 Nearby Percentages table shows the 5 entries from the standard 18-entry table closest to your target, with your target row highlighted. This context helps when your exact percentage isn't a standard increment: seeing the surrounding rows lets you decide whether to round up to the next standard percentage or use the exact value. All 5 rows show weight (rounded to your selected increment) and typical rep range.
Find % Mode: What Percentage Is That Weight?
When to Use Find % Mode
Three practical scenarios call for this mode. Reverse-engineering a working set: you lifted 225 lb for 5 reps and want to know what percentage of your 315 lb squat that is. Program compliance check: your program says 75%, but you loaded 230 lb; Find % tells you what you actually lifted. Progress tracking: you're lifting a weight that felt like a top set last year; find out if it still sits at the same percentage or has moved to a different zone.
The Over-Max Warning
If the weight you enter exceeds your entered 1RM, a warning appears. The calculation still runs, and the result may legitimately show a percentage above 100%. This isn't a blocking error. Common situations where this occurs: your true 1RM has improved since you last updated it (the calculation confirms you've exceeded your previous max), or you're using a training max (90% of 1RM) as the basis for your percentages and the entered weight represents a percentage of a lower number. Update your 1RM field to reflect your current max.
Using Find % to Identify Your Training Zone
The result shows the training zone the weight falls in alongside the percentage, including the zone's typical rep range. This is useful for lifters who program by feel or RPE but want to verify their working sets are in the intended zone. If your "heavy 5s" are coming out at 73% when your program targets 75-80%, Find % gives you the exact number to bring to your next training discussion with a coach.
The Six Training Zones Explained
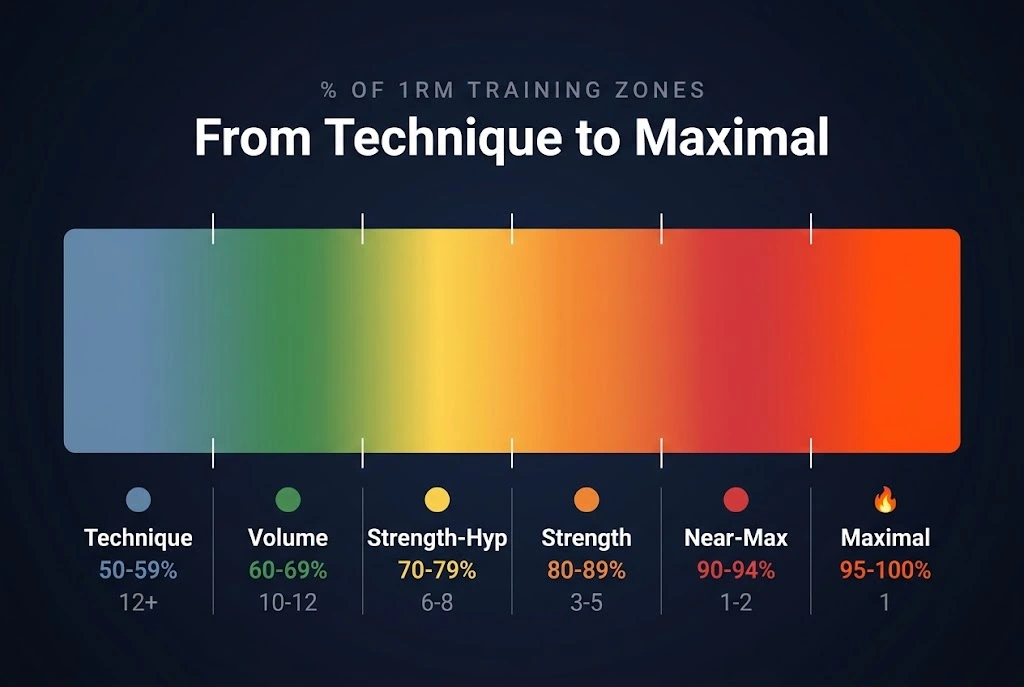
Understanding the zones turns a table of percentages into a training map. Each zone produces a distinct physiological stimulus; choosing the right zone depends on what you're training for in any given block. For the full percentage-to-rep relationship, see Rep Max Equivalency.
The Zones at a Glance
| Zone | % Range | Typical Reps | Training Goal |
| 🔵 Technique | 50–59% | 12+ reps | Warm-up, skill practice, movement quality |
| 🟢 Volume | 60–69% | 10–12 reps | Hypertrophy and work capacity |
| 🟡 Strength-Hypertrophy | 70–79% | 6–8 reps | Simultaneous strength and size development |
| 🟠 Strength | 80–89% | 3–5 reps | Heavy strength work, low reps, high intent |
| 🔴 Near-Maximal | 90–94% | 1–2 reps | Peaking and competition preparation |
| 🔥 Maximal | 95–100% | 1 rep | True max effort, at or near absolute 1RM |
Rep ranges are approximate maximums to failure for most lifters. Actual reps achievable depend on fatigue, RPE, training age, and readiness. Individual variation is significant.
🔵 Technique Zone (50–59%)
Loads in this zone produce minimal fatigue and are used for warm-up sets, technique practice, and movement quality work. At 50–59%, most trained lifters can perform 15 or more reps. These loads aren't meaningfully challenging from a strength stimulus perspective for intermediate or advanced lifters, but they serve a real role in preparing the nervous system and connective tissue before heavier work. Many coaches use 60% as the practical cutoff for "warm-up" loads.
🟢 Volume Zone (60–69%)
The volume zone is the primary hypertrophy training range for intermediate lifters. At 60–69%, most lifters can complete 10–12 clean reps before technical failure. High-volume blocks, accumulating large sets and reps, typically live here. This is where most bodybuilding-style programming operates. For strength athletes, volume zone work builds the muscle base that supports heavier strength percentages.
🟡 Strength-Hypertrophy Zone (70–79%)
The 70–79% range is a productive hybrid: heavy enough to drive neural adaptations toward strength, but with sufficient volume capacity (6–8 reps) to accumulate a hypertrophy stimulus. Most intermediate strength programs spend the majority of their working sets here. The half-step entries (72.5%, 77.5%) are particularly relevant for programs that progress through this zone in 2.5% increments per cycle.
🟠 Strength Zone (80–89%)
Working above 80% of 1RM is where maximal strength adaptations become dominant: low rep counts (3–5), high intent, and significant nervous system recruitment. This zone requires more recovery time than lighter zones. Most structured strength programs culminate their work sets here. The technique needs to be automatic before training regularly above 80%, because fatigue affects movement quality more sharply at higher intensities.
🔴 Near-Maximal Zone (90–94%)
Above 90%, volume drops to 1–2 reps per set; each set is a near-maximal effort. This zone is primarily used during peaking phases in the weeks before competition or a planned 1RM test. Working regularly above 90% carries meaningful injury and CNS fatigue risk and should be used in planned short blocks rather than as a sustained training approach. Most recreational lifters visit this zone only during testing.
🔥 Maximal Zone (95–100%)
At 95–100%, you're operating at or near your true ceiling. A single rep at 95–97.5% constitutes a near-maximum single; 100% is your 1RM. This zone is used almost exclusively in competition preparation, formal 1RM testing, or for advanced athletes who include heavy singles in their programming. Recovery from maximal-zone work is significantly longer than other zones; allow 5–7 days of reduced intensity after a near-maximal effort.
Rounding Options: Choosing the Right Increment
Rounding Options Overview
| Setting | lb options | kg options | Best for |
| Standard | 5 lb | 2.5 kg | Most gym environments; loads to the nearest common plate |
| Fine | 2.5 lb | 1.25 kg | Lifters with 1.25 lb or 1.25 kg fractional plates |
| Minimal | 1 lb | 1 kg | Precise loading; micro-plates available |
| Exact | Unrounded (1 decimal) | Unrounded (1 decimal) | Programming software, spreadsheets, data tracking |
Why Rounding Matters for Training
Unrounded outputs from percentage calculations often produce impractical numbers: 252.625 lb is not a loadable weight for most bars and plates. Rounding to 5 lb gives you 250 lb or 255 lb, both loadable. Standard rounding rounds to the nearest increment, so 252 lb rounds down to 250 lb (not up to 255 lb). This makes working weights slightly lighter or heavier than the exact target percentage, but within ±2.5 lb at 5 lb rounding, which is negligible for training purposes.
The Exact Mode: When to Skip Rounding
Exact mode returns values to 1 decimal place (e.g., 252.0, 236.3) with no rounding to a plate increment. Use this when feeding calculated weights into programming software that handles its own rounding, creating a spreadsheet that needs raw values, or tracking precise loads in a training log where discretization to a plate size would introduce unwanted variance.
Rounding Logic: How It Works
| % | Raw weight | 5 lb rounding | 2.5 lb rounding | 1 lb rounding | Exact |
| 80% | 252.00 lb | 250 lb | 252.5 lb | 252 lb | 252.0 lb |
| 75% | 236.25 lb | 235 lb | 235.0 lb | 236 lb | 236.3 lb |
| 67.5% | 212.63 lb | 215 lb | 212.5 lb | 213 lb | 212.6 lb |
| 90% | 283.50 lb | 285 lb | 282.5 lb | 284 lb | 283.5 lb |
Formula: round(weight ÷ increment) × increment. Rounding can go up or down: 252 lb rounds down to 250 lb at 5 lb increments; 253 lb rounds up to 255 lb.
Using Percentage Tables in Real Training Programs
Percentage-based programming is built on two things: a reliable 1RM and a clear table that converts it into weekly working weights. This calculator provides the second; the Strength Training Programming guide covers how to structure the blocks around it.
5/3/1: Why the Half-Step Percentages Matter
Jim Wendler's 5/3/1 program anchors work sets to a training max (TM) at 90% of the true 1RM. A 315 lb squatter uses a TM of 285 lb, and all 5/3/1 percentages are calculated from that TM. This produces working weights like 67.5%, 72.5%, and 77.5% of the true 1RM, exactly the half-steps in this calculator's 18-row table. For 5/3/1: enter your training max (not your true 1RM) as the 1RM input.
| Week | % of TM | Weight | Sets × Reps | Zone |
| Week 1 Set 1 | 65% | 185 lb | 5 | Volume |
| Week 1 Set 2 | 75% | 215 lb | 5 | Str-Hyp |
| Week 1 Set 3 | 85% | 240 lb | 5+ | Strength |
| Week 2 Set 1 | 70% | 200 lb | 3 | Str-Hyp |
| Week 2 Set 2 | 80% | 230 lb | 3 | Strength |
| Week 2 Set 3 | 90% | 255 lb | 3+ | Near-Max |
TM = Training Max (90% of 1RM = 285 lb). Enter your TM in the 1RM field to generate exact 5/3/1 set weights.
Prilepin's Table and Zone-Based Volume
Prilepin's Table, developed by Soviet weightlifting coach A.S. Prilepin, prescribes optimal set-and-rep volumes for each intensity zone. The Strength zone (80–89%) maps to Prilepin's 80–89% range, where he prescribes 10–20 total reps per session across multiple sets. Use the full table alongside Prilepin's table to design volume prescriptions per session.
Linear Periodization From a Single 1RM
The most direct application of this calculator: test your 1RM, generate the full table, and use it to plan a 12-week linear periodization block. Start in the Volume zone (60–70%) for weeks 1–4, progress to Strength- Hypertrophy (70–80%) for weeks 5–8, then a peak in the strength zone (80–90%) for weeks 9–12. The calculator generates the exact weight for every step. Re-test your 1RM at the end of the block, update the field, and repeat. For the full block structure, see the Progressive Overload guide.
Export, Print, and Take It to the Gym
Export to PDF
Clicking Export PDF generates a PDF entirely in your browser (saved as pct1rm-training.pdf); no server, no upload, no data leaves your device. The PDF content adapts to your mode:
- Full Table PDF: all 18 rows with zone labels, weights, and rep ranges: a single-page training reference formatted for printing and taking to the gym
- Find Weight PDF: your target percentage, the exact weight, zone label, typical rep range, and the 5 nearby rows
- Find % PDF: your calculated percentage, zone, typical rep range, and the 5 nearby rows
Print Your Training Table
Clicking Print opens the browser's print dialog with a dedicated print stylesheet that strips the calculator UI and renders a clean, ink-friendly version of your results. Use "Save as PDF" in the print dialog as a browser-native alternative to the Export PDF button. The full table print view is formatted to fit on a single standard page for gym reference.
Technical Notes and Limitations
Validation Rules
All computation runs client-side in JavaScript; no data is sent to any server. The engine is deterministic: identical inputs always return identical outputs. For background on the 1RM input, see the One Rep Max Basics guide.
| Input | Rule | Detail |
| 1RM | Required | Finite positive number; maximum 2,000 in any unit |
| Rounding increment | Must be ≥ 0 | Exact mode uses 0 increment. |
| Mode | Required | Full Table, Find Weight, or Find % |
| Target % (Find Weight) | 1–100 | Decimals allowed (e.g., 82.5) |
| Actual weight (Find %) | Finite positive | Exceeding 1RM triggers a warning but not an error; the calculation still runs. |
What This Calculator Can't Account For
- Rep ranges are approximations. The relationship between % of 1RM and reps to failure varies significantly by individual, lift, and training state. A 225 lb squatter may get 6 reps at 80%, while a 500 lb squatter may only get 3. Use zone rep ranges as guidelines, not rigid targets.
- 1RM is lift-specific. Run the calculator separately for each lift. A 315 lb squat and a 315 lb deadlift are different baselines that need separate tables.
- Fatigue and readiness matter. On a heavy training day, your effective 1RM may be lower than your tested max. RPE-based programming accounts for this; percentage-only programming does not.
- The 1RM input needs to be accurate. An estimated 1RM from a multi-rep set is accurate within ±5% at 1–5 reps, which is good enough for programming. If you used a 10+ rep set for the estimate, treat the resulting percentages with more caution. See, How Accurate Are 1RM Calculators?