How to Deadlift with Proper Form: Step-by-Step Guide
Most deadlift form problems are set before the bar moves. Get the setup right before you take the slack out, and the pull mostly runs itself. Get them wrong, and no cue halfway up will save the rep.
Proper deadlift form comes down to five setup steps: feet under the bar, a grip just outside your legs, shins to the bar, a flat back with your chest up, and a big brace before you pull. Then push the floor away and stand tall until your hips and knees lock, as the IPF rule requires.
This guide covers the conventional pull. For the basics of what a deadlift is and the other lifts, see the lift-specific 1RM guides.
What Good Deadlift Form Looks Like?
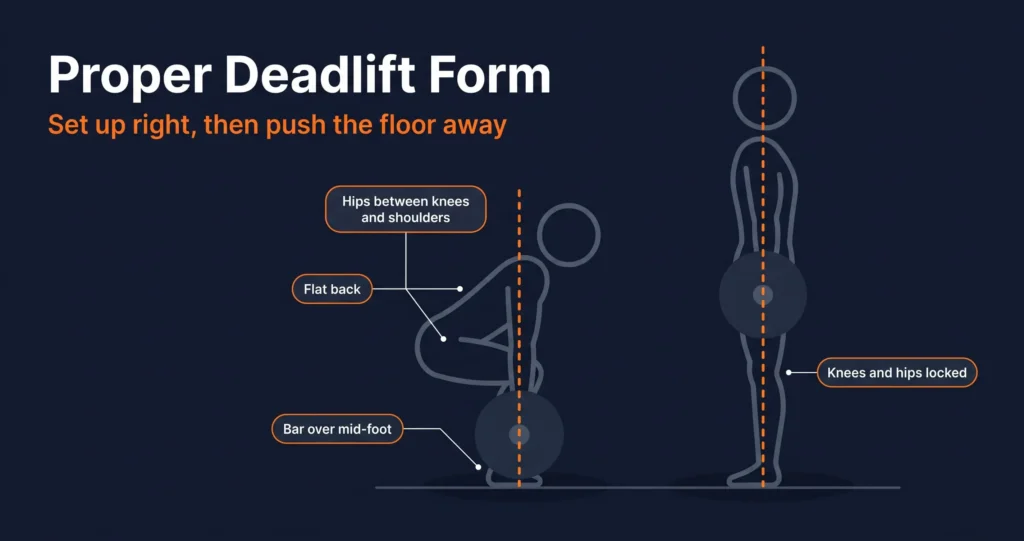
Good deadlift form keeps the bar close and moving in a near-vertical line over the middle of your foot, with your spine held in one position from the floor to lockout. It matters because a bar that drifts forward gets heavier on your lower back with every inch it travels away from you.
The finish is defined by the International Powerlifting Federation, whose rules fail a lift for “Failure to stand erect with the shoulders back” and “Failure to lock the knees straight at the completion of the lift.” (IPF Technical Rulebook, 2026) You don’t need to compete to use that standard. It’s a clear, checkable picture of a finished rep.
Four checkpoints tell you whether a rep was good. Film from the side at hip height and check each one.
| Checkpoint | What good looks like | Common fault |
| Bar path | Straight up over mid-foot, bar touching the legs | Bar swings out in front of the knees. |
| Back position | Same flat back angle from floor to knees | Lower back rounds as the bar breaks the floor. |
| Hip height | Hips above the knees, below the shoulders | Hips shoot up first, turning it into a stiff-leg pull. |
| Lockout | Hips and knees straight, shoulders back, standing tall | Leaning back past vertical, or soft knees |
Deadlift form checkpoints to film from the side. Lockout standard based on the IPF Technical Rulebook (2026).
Before You Pull: What You Need
Learning deadlift form is easier when the setup is sorted first, so the only thing you’re working on is the movement. You need less than you’d think:
- Flat, firm shoes or socks. Soft running shoes let your heels sink and shift your balance.
- Full-size plates. Plates up to 45 cm across put the bar about 9 inches (22.5 cm) off the floor, the standard start height. With lighter weights, use bumper plates or set small plates on blocks to match.
- A phone propped up for a side-view video. You can’t see your own back angle.
- Enough room to drop the bar forward safely if a rep goes wrong.
- A general warm-up: 5 minutes of easy movement, then your first sets with the empty bar.
How to Deadlift: Step by Step
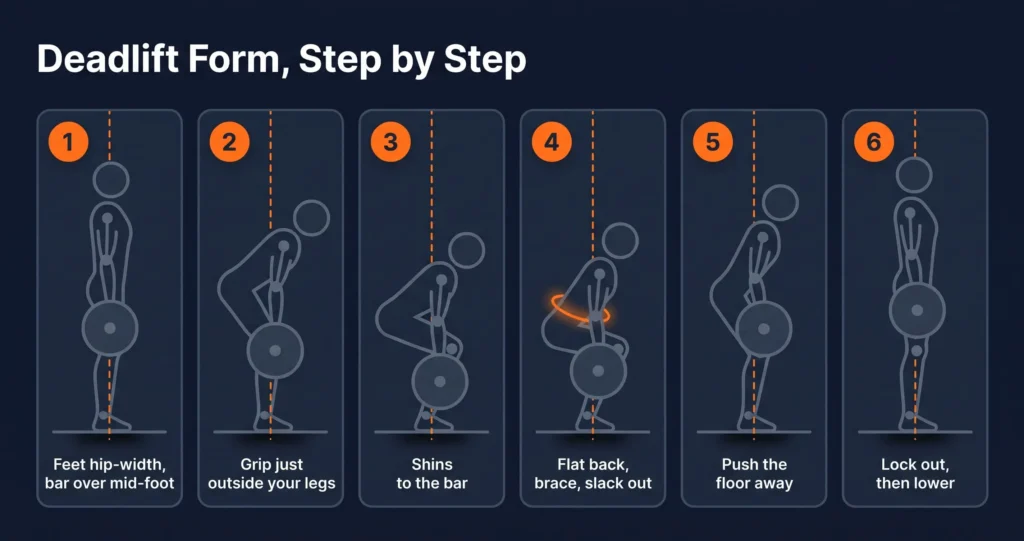
The deadlift sequence is six steps, the same every rep. Learn it with an empty bar or 95 lb until you can repeat it without thinking, then add weight.
- Set your feet hip-width apart with the bar over mid-foot.
- Grip the bar just outside your legs.
- Bend your knees until your shins touch the bar.
- Flatten your back, tighten your lats, and brace.
- Push the floor away until the bar passes your knees.
- Drive your hips forward to lock out, then lower under control.
Step 1: Set Your Feet
For a conventional deadlift, stand with your feet about hip-width apart and your toes turned out slightly. Walk in until the bar sits over the middle of your foot, which leaves it roughly an inch from your shins. Mid-foot is a coaching convention, not a rule, but it’s where your balance point sits, so a bar there can travel straight up without dragging you forward.
Step 2: Grip the Bar
Bend at the hips, keep your legs straight for now, and take your grip just outside your shins, so your arms hang straight down without brushing your knees. A wider grip makes the bar travel further. Start with both palms facing you (double overhand) and keep it there as long as your grip holds.
Choosing a Deadlift Grip
Your deadlift grip only becomes a decision when the weight gets heavy enough to slip.
| Grip | How it works | Trade-off |
| Double overhand | Both palms facing you | Easiest to learn; fails first as weights climb |
| Hook grip | Thumb wrapped under the first two fingers | Very secure; uncomfortable on the thumb until you adapt. |
| Mixed grip | One palm toward you, one away | Strong hold; uneven load, so alternate which hand is under |
| Straps | Fabric loops wrapped around the bar | Takes grip out of the lift; save for accessory or high-rep work |
Common deadlift grips and their trade-offs. Recommendations reflect standard coaching practice.
On a mixed grip, many coaches tell lifters to keep the underhand elbow fully straight, because pulling with a bent arm loads the biceps. Treat that as coaching practice rather than a measured risk.
Step 3: Bring Your Shins to the Bar
With your grip set, bend your knees until your shins touch the bar; this is the step that decides your hip height and most of your deadlift form. Don’t let the bar roll forward as you do it. Your hips should now sit above your knees and below your shoulders. If they’re as low as a squat, the bar ends up in front of your knees, and you’ll have to swing it around them.
Step 4: Set Your Back and Brace
Lift your chest until your lower back is flat, then tighten your lats as if you’re trying to bend the bar around your legs. Take a big breath into your belly, hold it and brace your trunk hard, then pull just enough to take the slack out of the bar until you hear the plates click.
That held breath does real work. A 2019 review of 16 studies by Dusan Blazek and colleagues found intra-abdominal pressure of 161–176 mmHg during deadlifts, leg presses, and slide rows (Blazek et al., 2019). The same review advised untrained people to avoid heavy deadlifts until they’ve adapted to high loads and recommended the bench press and slide row for beginners and people with hypertension. If you have high blood pressure, talk to your doctor before you train heavy deadlifts.
Step 5: Push the Floor Away
Start the pull by pushing your feet into the floor rather than yanking with your back. Your hips and shoulders should rise at the same rate, so your back angle doesn’t change until the bar passes your knees. Keep the bar touching your legs the whole way. A bar that drags up your shins is a good sign.
Step 6: Lock Out and Lower
Once the bar passes your knees, drive your hips forward until you’re standing tall with your knees straight and shoulders back. Stop there. Leaning back past vertical adds nothing and loads your lower back for no reason.
To lower the bar, push your hips back first, let it slide down your thighs, and bend your knees once it passes them. Reset your brace before every rep instead of bouncing the plates off the floor.
Using Your Deadlift 1RM to Plan Form Practice
Your deadlift 1RM tells you how heavy practice sets should be: heavy enough that form has to hold, light enough that it does. Most lifters learn fastest with working sets around 65–75% of their estimated max, which you can get from a deadlift 1RM estimate using one hard set.
Worked Example: A First Form Session at 320 lb
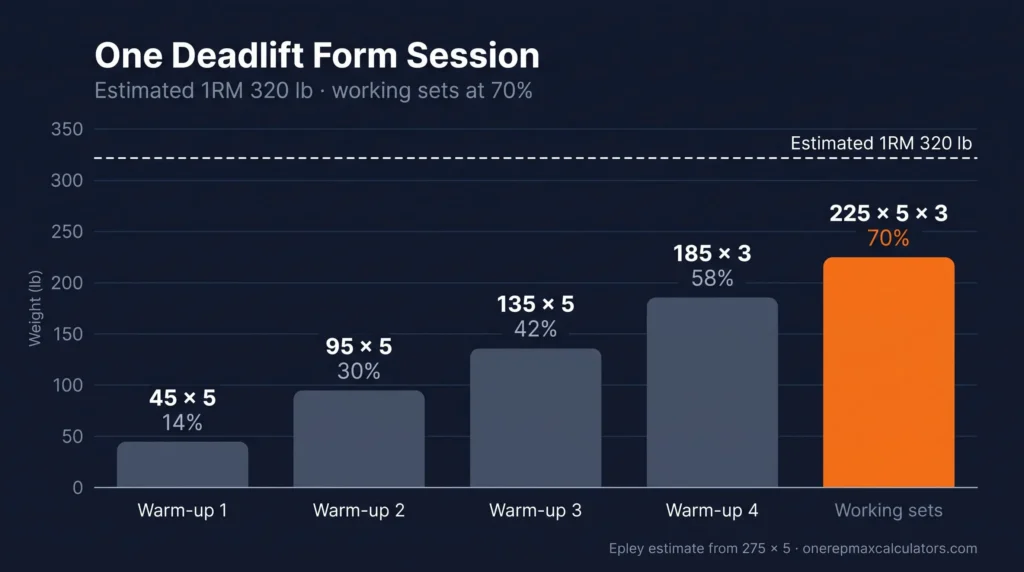
Take a 180 lb man who has pulled 275 lb for 5 reps. The Epley formula puts his estimated 1RM at 320 lb (320.8, rounded to the nearest 5 lb). For a deadlift form session, he works up in small jumps and keeps every working rep at 70%.
| Set | Weight × reps | % of 320 lb 1RM | Focus |
| Warm-up 1 | 45 lb × 5 | 14% | Groove the six steps. |
| Warm-up 2 | 95 lb × 5 | 30% | Bar over mid-foot, shins to bar |
| Warm-up 3 | 135 lb × 5 | 42% | Brace and take the slack out. |
| Warm-up 4 | 185 lb × 3 | 58% | Hips and shoulders rise together. |
| Working sets | 225 lb × 5, 3 sets | 70% | Film set 1; fix one fault per set. |
A deadlift form session built from a 320 lb estimated 1RM, rounded to loadable weights. Calculated by onerepmaxcalculators.com.
If you’d rather not work out the jumps yourself, the homepage warm-up ramp builds them from your working weight. Add weight to the working sets only when every rep on the video passes the four checkpoints, then use progressive overload in 5–10 lb jumps.
Deadlift Form for Women
The deadlift form for women is the same as for men: the same six steps and the same four checkpoints. Differences between lifters come from build, not sex. Someone with longer arms or a shorter torso often finds a slightly different hip height or stance width comfortable, and some lifters with wider hips feel better in a wider stance or sumo. Strength standards differ between men and women. Technique doesn’t.
Do You Need a Spotter for Deadlifts?
You don’t need a spotter for deadlifts the way you do for a bench press, because a failed deadlift ends with you simply putting the bar down. Nobody can safely grab a bar off the floor mid-rep. A training partner is still useful for filming from the side and keeping the area around the platform clear before you pull.
Common Deadlift Form Mistakes
Most deadlift form mistakes trace back to a rushed setup. These are the ones that cost lifters the most:
- Squatting the deadlift. Sinking your hips to squat depth pushes the bar in front of your knees.
- Hips shooting up first. Your legs straighten, your back does all the work, and the pull turns into a stiff-leg deadlift.
- Letting the bar drift forward off your legs, usually because your lats aren’t tight.
- Jerking the bar off the floor instead of taking the slack out, which breaks your back position before the rep starts.
- Leaning back hard at lockout. Standing tall is the finish.
- Chasing weight while your lower back rounds. Drop the load, fix the setup, and build back up.
Where a heavy rep slows down also shows which muscle is limiting you; the deadlift muscles worked guide matches each sticking point to an accessory.
Frequently Asked Questions
Your next deadlift session is the place to start. Put your phone at hip height, film every working set from the side, and check each rep’s deadlift form against the four checkpoints before you add any weight. When three sets of 5 all pass, enter your best set for a deadlift 1RM estimate and use that number to plan your next block.