
How to Calculate Percentage of 1RM for Any Rep Range
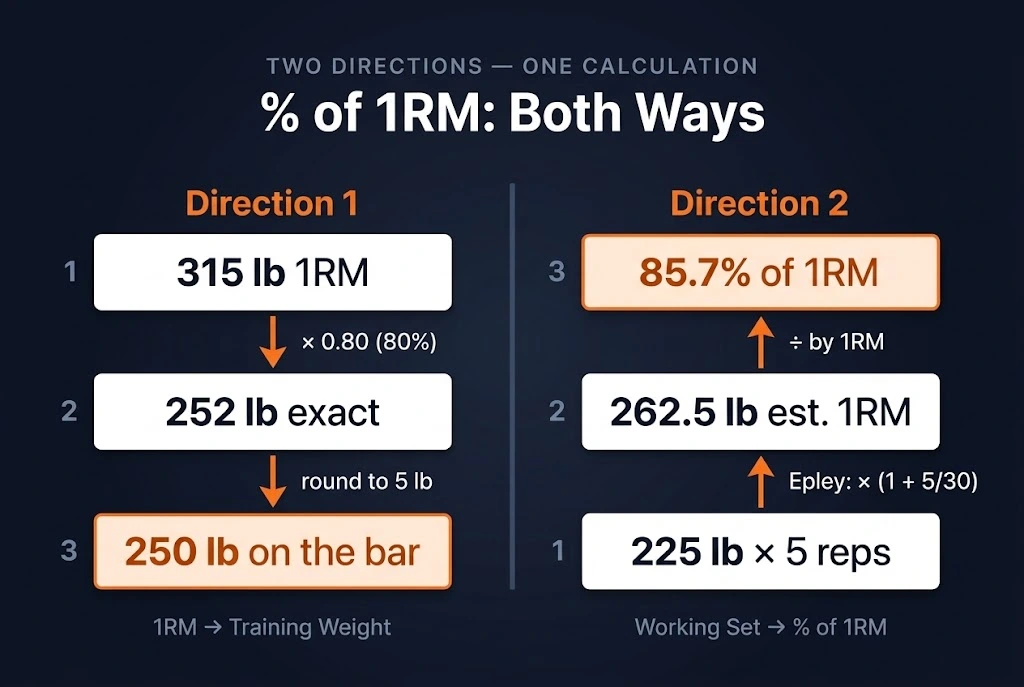
Percentage-based programs prescribe loads as a fraction of your maximum, but knowing that fraction doesn’t automatically tell you what weight to put on the bar. This article covers both sides of the percentage of 1rm calculation: Direction 1: from a known 1RM to the training weight that belongs at a given percentage, and Direction 2: from a completed working set back to the percentage it represents. If you don’t have a tested 1RM yet, the one rep max calculator can estimate one from any recent multi-rep set before you begin.
Key points at a glance:
- The calculation works in two directions: 1RM → training weight, and working set → % of 1RM
- Direction 1 formula: Training Weight = 1RM × (target % ÷ 100)
- Direction 2 formula: % of 1RM = (weight lifted ÷ estimated 1RM) × 100
- Rep-to-% relationships are approximate: different formulas give different values; the standard table uses population averages
- At 80% of 1RM, most trained lifters complete approximately 7–8 reps
- The training max on 5/3/1 is typically set at 90% of the true 1RM, not 100%
What Is the Percentage of 1RM, and Why Does It Matter?
A percentage of 1RM is a fraction of the maximum weight a lifter can lift once, expressed as a percentage. Programming in percentages solves the problem of absolute weights: “Lift 225 lb” is meaningless for a 150 lb and a 300 lb lifter, but “Lift 80% of your 1RM” prescribes the same relative intensity to both. The percentage controls the training stimulus: how hard the session is relative to the individual’s ceiling, regardless of absolute numbers. Percentage-based programming is how coaches prescribe identical effort levels across athletes of different sizes, training ages, and strength levels.
Why Every Percentage-Based Program Needs This Calculation
When a program says “4 sets of 5 at 80%,” that instruction is useless without knowing what 80% of your 1RM corresponds to in kilograms or pounds. The calculation is the bridge between the program’s intent (a specific training stimulus) and the practical action (loading specific weight on the bar). Without it, the lifter is guessing, and even small errors compound across a full training block, producing sessions that are consistently too easy or too hard. For lifters without a tested 1RM to work from, the 1RM for Beginners guide covers where to start.
The Two Directions: The Framework Most Articles Miss
Most resources cover only one direction of this calculation: finding a training weight from a known 1RM. There is a second direction equally worth knowing: reverse-engineering what percentage a completed working set represented. A lifter who runs Direction 2 regularly can track whether their training is sitting in the intended intensity zone, whether their 1RM estimate is still accurate, and whether progressive overload is actually happening across cycles.
Direction 1: From 1RM to Training Weight
The Direction 1 use case: a lifter who knows their 1RM and needs to find the weight to load for a prescribed percentage. A program says “70% × 5 reps” and the lifter needs to know what to put on the bar. A single multiplication produces the exact answer, which then rounds to the nearest practical plate increment.
Direction 2: From a Working Set to % of 1RM
The Direction 2 use case: a lifter who just completed a working set and wants to know what percentage of their 1RM it represented. It tells them whether today’s set was in the right intensity zone, whether the 1RM estimate is still accurate, and whether training is progressive over time. It requires two steps: estimating the 1RM from the set first, then calculating the percentage.
Direction 1: How to Calculate Training Weight from a % of 1RM
The Formula
Training Weight = 1RM × (Target % ÷ 100)
In plain English, multiply your 1RM by the percentage as a decimal. For 80%, multiply by 0.80. For 75%, multiply by 0.75. The output is the mathematically exact weight, which then rounds to a practical plate increment. The Epley Formula underpins the 1RM estimate feeding into this calculation for most calculators.
Step-by-Step Calculation
- Know your 1RM. If you don’t have a tested 1RM, estimate one from a multi-rep set using the one rep max calculator.
- Identify the target percentage. Your program prescribes a specific percentage (for example, 80%).
- Multiply: 1RM × (target % ÷ 100). For a 315 lb 1RM at 80%: 315 × 0.80 = 252 lb.
- Round to a practical increment. 252 lb rounds to 250 lb at a 5 lb increment: this is what goes on the bar.
Worked Example: 315 lb 1RM at Four Common Percentages
Example: 1RM = 315 lb
| Target % | Calculation | Exact Weight | Rounded (5 lb) | Zone |
| 65% | 315 × 0.65 | 204.75 lb | 205 lb | Volume |
| 75% | 315 × 0.75 | 236.25 lb | 235 lb | Strength-Hypertrophy |
| 80% | 315 × 0.80 | 252.00 lb | 250 lb | Strength |
| 85% | 315 × 0.85 | 267.75 lb | 270 lb | Strength |
| 90% | 315 × 0.90 | 283.50 lb | 285 lb | Near-Maximal |
Rounding goes to the nearest 5 lb: 252 rounds down to 250; 267.75 rounds up to 270.
Direction 2: How to Find What % of 1RM You’re Lifting
Why Knowing Your % Matters
A lifter who programs “3 × 5 at 80%” but has a slightly inflated 1RM estimate may actually be training at 85–88%, meaning it is significantly harder than intended. Calculating the percentage of a working set reveals whether the prescribed stimulus is matching actual intensity. It also helps a lifter verify their 1RM estimate is still accurate after a training block or a bodyweight change.
The Two-Step Process
- Record the weight and reps from a maximal-effort set. Use a set taken close to failure: the closer to failure, the more accurate the subsequent estimate.
- Estimate your 1RM from the set using any formula. Epley gives: Estimated 1RM = weight × (1 + reps ÷ 30). Example: 225 lb × 5 reps → 225 × (1 + 5/30) = 225 × 1.167 = 262.5 lb estimated 1RM.
- Divide the working weight by the estimated 1RM: 225 ÷ 262.5 = 0.857 = 85.7% of 1RM. That set was a strength-zone effort.
The estimated 1RM in Step 2 is itself approximate: for better accuracy, run the calculation through the one rep max calculator and use the average of all 7 formulas rather than Epley alone. For accuracy context, see How Accurate Are 1RM Calculators?
The Standard Percentage Table: Reference for Any Rep Range
The 18-row table below covers the full practical range from technique work at 50% to a true maximum at 100%. The half-step values (67.5%, 72.5%, and so on) are included for 5/3/1 program compatibility. For deeper chart interpretation and how to convert between rep maxes, see the Rep Max Equivalency guide.
| % of 1RM | ★ | Approx. Max Reps | Training Zone |
| 50% | 20+ | 🔵 Technique | |
| 55% | 17–20 | 🔵 Technique | |
| 60% | 14–16 | 🟢 Volume | |
| 65% | 12–14 | 🟢 Volume | |
| 67.5% | 5/3/1 | 11–12 | 🟢 Volume |
| 70% | 10–11 | 🟡 Strength-Hypertrophy | |
| 72.5% | 5/3/1 | 9–10 | 🟡 Strength-Hypertrophy |
| 75% | 8–9 | 🟡 Strength-Hypertrophy | |
| 77.5% | 5/3/1 | 7–8 | 🟡 Strength-Hypertrophy |
| 80% | 6–8 | 🟠 Strength | |
| 82.5% | 5/3/1 | 5–6 | 🟠 Strength |
| 85% | 4–5 | 🟠 Strength | |
| 87.5% | 5/3/1 | 3–5 | 🟠 Strength |
| 90% | 3–4 | 🔴 Near-Maximal | |
| 92.5% | 5/3/1 | 2–3 | 🔴 Near-Maximal |
| 95% | 1–2 | 🔥 Maximal | |
| 97.5% | 5/3/1 | 1 | 🔥 Maximal |
| 100% | 1 (true max) | 🔥 Maximal |
★ = half-step percentages included for 5/3/1-style program compatibility. Rep ranges are population averages: individual results vary. Source: NSCA Training Load Chart
Why the Percentages Are Approximate
The rep-to-percentage relationship is not a fixed law: it’s a population average derived from research data. Different 1RM prediction formulas produce slightly different percentage values for the same rep count. At 5 reps, Epley gives 85.7%, Lombardi gives 85.1%, and Mayhew gives 84.0%. This is why different calculators give slightly different results and why the table is labelled “approx.” Use it as a practical guide, not a precise fact. For the full formula comparison, see All 1RM Formulas Compared.
Why Half-Step Percentages Are Included
The table includes 67.5%, 72.5%, 77.5%, 82.5%, 87.5%, 92.5%, and 97.5% because Jim Wendler’s 5/3/1 program sets the training max at 90% of the tested 1RM and calculates all weekly percentages from that training max. The resulting weights, expressed as a fraction of the true 1RM, fall on these half-step values. A lifter running 5/3/1 needs these steps to look up their exact working weights without interpolating between standard 5% increments.
The Six Training Zones: What Each Percentage Range Actually Trains
| Zone | % Range | Typical Reps | Primary Stimulus |
| 🔵 Technique | 50–59% | 15–30 | Movement practice; neural warm-up |
| 🟢 Volume | 60–69% | 12–20 | Work capacity; hypertrophy foundation |
| 🟡 Strength-Hypertrophy | 70–79% | 8–12 | Simultaneous strength and size gains |
| 🟠 Strength | 80–89% | 4–8 | Maximal strength adaptation; neural efficiency |
| 🔴 Near-Maximal | 90–94% | 2–4 | Peaking; competition preparation |
| 🔥 Maximal | 95–100% | 1–2 | True max effort; testing or competition |
Matching Your Program to the Right Zone
Knowing the zones helps a lifter verify their programme is doing what it claims. A “hypertrophy program” that prescribes 90% 1RM sets is actually a strength programme. A “strength program” that keeps all sets below 70% is missing the primary strength stimulus. The zone table is the diagnostic tool for checking programme design against its stated goal. For the full block structure see Strength Training Programming.
Applying % of 1RM in Real Programs
Why Most Percentage Programs Use a Training Max, Not the True 1RM
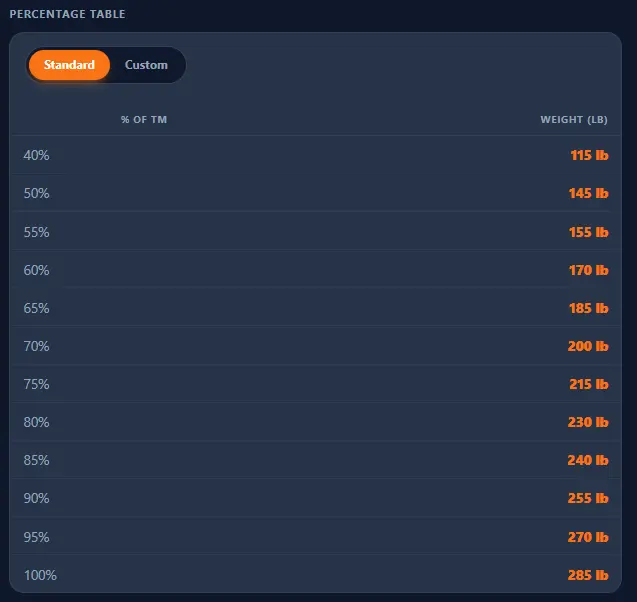
Most intermediate programs don’t prescribe “80% of your true 1RM.” They prescribe “80% of your training max” (TM), where the TM is set at 90–95% of the tested 1RM. In 5/3/1, the TM is 90% of the 1RM. All program percentages apply to this lower number. A 90% session at a 90% TM represents only 81% of the true 1RM, which sounds modest but is the correct intensity for sustainable, long-term progress. Use the Training Max Calculator to compute your TM and all dependent working weights in one step.
How Often to Recalculate
Percentages are only as good as the 1RM they’re based on. A 1RM that’s 3 months old and 5% outdated means every percentage in the programme is off by 5%, consistently underloading or overloading. For beginners and early intermediates, recompute the 1RM estimate every 4–6 weeks using a new multi-rep submaximal set. For advanced lifters, every 8–12 weeks at the end of a mesocycle is sufficient.
Common Mistakes When Working with % of 1RM
- Using an outdated 1RM. Strength changes fast, especially for beginners. An 1RM estimate that’s months old makes every percentage in the programme inaccurate. Re-test or re-estimate every 4–8 weeks.
- Trusting high-rep estimates. Estimating a 1RM from a 15-rep set, then building a training programme from that estimate, amplifies the error in both the estimate and every percentage applied to it. Use 3–5 rep sets for the most reliable 1RM estimates.
- Ignoring rounding. Programming calls for 252 lb but the lifter loads 255 lb “because it’s close.” Across 20 weeks that small drift compounds into consistent overloading. Round correctly: down for conservative estimates, to the nearest increment for standard programming.
- Applying the same 1RM to all lifts. A 315 lb squat 1RM produces a different set of working weights than a 315 lb bench press 1RM. Run the calculation separately for each lift.
Using the Calculator Instead of Manual Calculation
The manual calculation method above is the foundation. For ongoing use, the Percentage & Rep-Max Table in the one rep max calculator generates the complete training table automatically from any entered 1RM: all 18 standard percentages, all zones, all weights, rounded to any plate increment you choose. Enter your 1RM, open the accordion, and the full table appears. Bookmark the page or export the PDF for reference throughout the training block. The manual method in this article is what the calculator is doing behind the scenes.
Frequently Asked Questions
The manual calculations in this article are the same operations the Percentage & Rep-Max Table performs automatically. Understanding them makes the calculator’s output legible rather than magic: and knowing both directions of the calculation makes it possible to audit the training stimulus of any set, and also to plan one before it happens. Start at the 1RM Formulas & Calculations guide for the formula context behind every percentage table.